工程部署(三):低算力平台模型性能的优化_陈e
 前言: 此文讨论如何在低端的移动设备上提高模型性能,文章针对模型(不改变模型原有op情况下,不需要重新训练)和后处理两部分的优化开展讲解,若有不当之处,望批评指出!
一、模型优化
1.1 op融合
此处的模型优化指的是我们常说的模型卷积层与bn层的融合或者conection,identity等结构重参化的操作,改想法来源于某天无意参与的一次讨论:

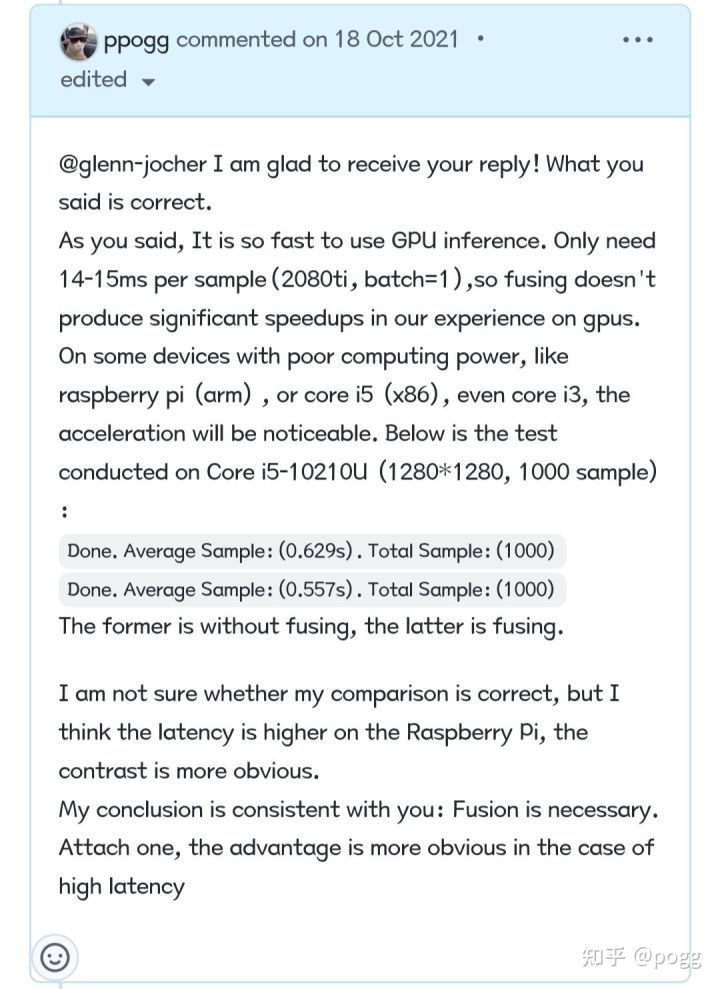
大佬的想法认为fuse是可以做的,但没那么必要,fuse(conv+bn)=CB的作用在于其他,而对于提速的作用微乎及微,不过本人更加坚持自己的观点,因为yolov5的对比是基于高算力显卡,低端卡,甚至无GPU,NPU加持的设备是有明显的提速作用。
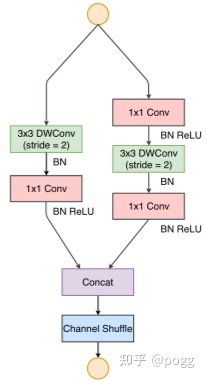
特别对于复用太多group conv或depthwise conv的模型,举个例子,shufflenetv2被当成是高效的移动端网络而被常常使用于端侧的backbone,我们看到单个shuffle block(stride=2)的组件就使用了两个深度可分离卷积:

光是一整套网络就用了25组depthwise conv(原因在于shufflenet系列为低算力cpu设备设计,无可避免复用大量深度分离卷积)
于是本着这样的初衷,做了一套基于v5lite-s模型的实验,并将测试结果贴出供大家相互交流:

以上测试结果基于对shuffle block的所有卷积和bn层进行融合的结果,抽取coco val2017中的1000张图片进行测试,可以看到,在i5的核上,fuse后的模型在x86 cpu上单次向前的加速很明显。若是对于arm端cpu,效果会更加明显。
融合的脚本如下所示:
import torch
from thop import profile
from copy import deepcopy
from models.experimental import attempt_load

def model_print(model, img_size):
    # Model information. img_size may be int or list, i.e. img_size=640 or img_size=[640, 320]
    n_p = sum(x.numel() for x in model.parameters())  # number parameters
    n_g = sum(x.numel() for x in model.parameters() if x.requires_grad)  # number gradients

    stride = max(int(model.stride.max()), 32) if hasattr(model, 'stride') else 32
    img = torch.zeros((1, model.yaml.get('ch', 3), stride, stride), device=next(model.parameters()).device)  # input
    flops = profile(deepcopy(model), inputs=(img,), verbose=False)[0] / 1E9 * 2  # stride GFLOPS
    img_size = img_size if isinstance(img_size, list) else [img_size, img_size]  # expand if int/float
    fs = ', %.6f GFLOPS' % (flops * img_size[0] / stride * img_size[1] / stride)  # imh x imw GFLOPS

    print(f"Model Summary: {len(list(model.modules()))} layers, {n_p} parameters, {n_g} gradients{fs}")

if __name__ == '__main__':
    load = 'weights/v5lite-e.pt'
    save = 'weights/repv5lite-e.pt'
    test_size = 320
    print(f'Done. Befrom weights:({load})')
    device = torch.device("cuda" if torch.cuda.is_available() else "cpu")
    model = attempt_load(load, map_location=device)  # load FP32 model
    torch.save(model, save)
    model_print(model, test_size)
    print(model)
            if type(m) is Shuffle_Block:
                if hasattr(m, 'branch1'):
                    re_branch1 = nn.Sequential(
                        nn.Conv2d(m.branch1[0].in_channels, m.branch1[0].out_channels,
                                  kernel_size=m.branch1[0].kernel_size, stride=m.branch1[0].stride,
                                  padding=m.branch1[0].padding, groups=m.branch1[0].groups),
                        nn.Conv2d(m.branch1[2].in_channels, m.branch1[2].out_channels,
                                  kernel_size=m.branch1[2].kernel_size, stride=m.branch1[2].stride,
                                  padding=m.branch1[2].padding, bias=False),
                        nn.ReLU(inplace=True),
                    )
                    re_branch1[0] = fuse_conv_and_bn(m.branch1[0], m.branch1[1])
                    re_branch1[1] = fuse_conv_and_bn(m.branch1[2], m.branch1[3])
                    # pdb.set_trace()
                    # print(m.branch1[0])
                    m.branch1 = re_branch1
                if hasattr(m, 'branch2'):
                    re_branch2 = nn.Sequential(
                        nn.Conv2d(m.branch2[0].in_channels, m.branch2[0].out_channels,
                                  kernel_size=m.branch2[0].kernel_size, stride=m.branch2[0].stride,
                                  padding=m.branch2[0].padding, groups=m.branch2[0].groups),
                        nn.ReLU(inplace=True),
                        nn.Conv2d(m.branch2[3].in_channels, m.branch2[3].out_channels,
                                  kernel_size=m.branch2[3].kernel_size, stride=m.branch2[3].stride,
                                  padding=m.branch2[3].padding, bias=False),
                        nn.Conv2d(m.branch2[5].in_channels, m.branch2[5].out_channels,
                                  kernel_size=m.branch2[5].kernel_size, stride=m.branch2[5].stride,
                                  padding=m.branch2[5].padding, groups=m.branch2[5].groups),
                        nn.ReLU(inplace=True),
                    )
                    re_branch2[0] = fuse_conv_and_bn(m.branch2[0], m.branch2[1])
                    re_branch2[2] = fuse_conv_and_bn(m.branch2[3], m.branch2[4])
                    re_branch2[3] = fuse_conv_and_bn(m.branch2[5], m.branch2[6])
                    # pdb.set_trace()
                    m.branch2 = re_branch2
                    # print(m.branch2)
        self.info()

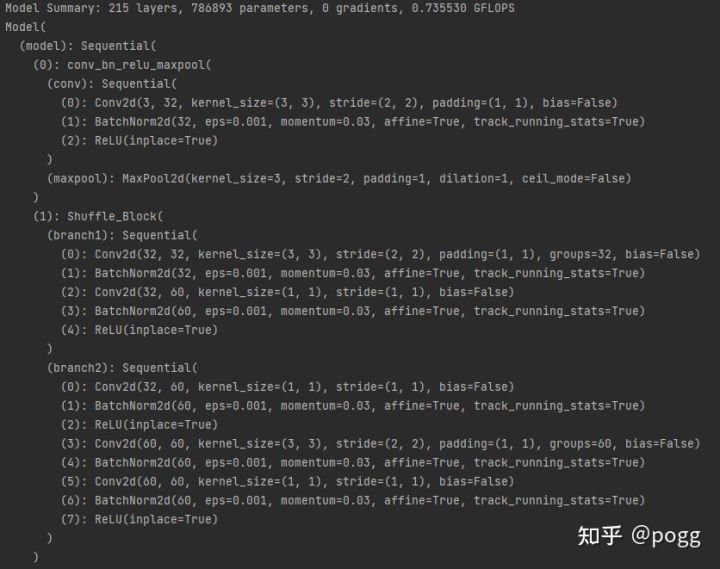
而融合后的模型参数量减少了0.5万,计算量少了0.6万,主要还是来源于bn层,并且可以看到单个branch2分支中的op减少了三个,整套backbone网络算下来共减少了25个bn层

1.2 重参化
前言中提到的重参化操作之重要性更甚于op融合,引入前期提到的g模型:追求极致:Repvgg重参化对YOLO工业落地的实验和思考(https://zhuanlan.zhihu.com/p/410874403),由于g模型为高性能gpu涉及,backbone使用了repvgg,在训练时通过rbr_1x1和identity进行涨点,但推理时必须重参化为3×3卷积,才具有高性价比,最直观的,使用以下代码对每个repvgg block进行重参化和融合:
            if type(m) is RepVGGBlock:
                if hasattr(m, 'rbr_1x1'):
                    # print(m)
                    kernel, bias = m.get_equivalent_kernel_bias()
                    rbr_reparam = nn.Conv2d(in_channels=m.rbr_dense.conv.in_channels,
                                            out_channels=m.rbr_dense.conv.out_channels,
                                            kernel_size=m.rbr_dense.conv.kernel_size,
                                            stride=m.rbr_dense.conv.stride,
                                            padding=m.rbr_dense.conv.padding, dilation=m.rbr_dense.conv.dilation,
                                            groups=m.rbr_dense.conv.groups, bias=True)
                    rbr_reparam.weight.data = kernel
                    rbr_reparam.bias.data = bias
                    for para in self.parameters():
                        para.detach_()
                    m.rbr_dense = rbr_reparam
                    # m.__delattr__('rbr_dense')
                    m.__delattr__('rbr_1x1')
                    if hasattr(self, 'rbr_identity'):
                        m.__delattr__('rbr_identity')
                    if hasattr(self, 'id_tensor'):
                        m.__delattr__('id_tensor')
                    m.deploy = True
                    m.forward = m.fusevggforward  # update forward
                # continue
                # print(m)

            if type(m) is Conv and hasattr(m, 'bn'):
                # print(m)
                m.conv = fuse_conv_and_bn(m.conv, m.bn)  # update conv
                delattr(m, 'bn')  # remove batchnorm
                m.forward = m.fuseforward  # update forward
        """
        需要重参化后才能进行fuse操作,否则会出现重参化失败的情况
       """

二、后处理
2.1 反函数操作
后处理的优化也同样重要,而后处理优化的目的在于减少低效率循环或判断语句,避免大量使用昂贵算子等。
我们使用yolov5基于ncnn demo的代码进行测试和修改,但由于源码链接太多库,我们单抽general_poprosal函数,仿造general_poprosal函写一段使用sigmoid计算confidence再比对80类,计算bbox坐标的操作。
float sigmoid(float x)
{
    return static_cast<float>(1.f / (1.f + exp(-x)));
}

vector<float> ram_cls_num(int num)
{
    std::vector<float> res;
    float a = 10.0, b = 100.0;
    srand(time(NULL));//设置随机数种子,使每次产生的随机序列不同
    cout<<"number class:"<<endl;
    for (int i = 1; i <= num; i++)
    {
        float number = rand() % (N + 1) / (float)(N + 1);
        res.push_back(number);
        cout<<number<<' ';
    }
    cout<<endl;
    return res;
}

int sig()
{
    int num_anchors = 3;
    int num_grid_y = 224;
    int num_grid_x = 224;
    float prob_threshold = 0.6;
    std::vector<float> num_class = ram_cls_num(80);

    clock_t start, ends;
    start = clock();
    for (int q = 0; q < num_anchors; q++)
    {
        for (int i = 0; i < num_grid_y; i++)
        {
            for (int j = 0; j < num_grid_x; j++)
            {
                float tmp = i * num_grid_x + j;
                float box_score = rand() % (N + 1) / (float)(N + 1);
                // find class index with max class score
                int class_index = 0;
                float class_score = 0;
                for (int k = 0; k < num_class.size(); k++)
                {
                    float score = num_class[k];
                    if (score > class_score)
                    {
                        class_index = k;
                        class_score = score;
                    }
                }
                float prob_threshold = 0.6;
                float confidence = sigmoid(box_score) * sigmoid(class_score);
                if (confidence >= prob_threshold)
                {
                    float dx = sigmoid(1);
                    float dy = sigmoid(2);
                    float dw = sigmoid(3);
                    float dh = sigmoid(4);
                }
            }
        }
    }
    ends = clock() - start;
    cout << "sigmoid function cost time:" << ends << "ms" <<endl;
    return 0;
}
number class:
0.65 0.08 0.62 0.33 0.79 0.7 0.44 0 0.96 0.75 0.92 0.66 0.54 0.23 0.14 0.75 0.94 0.88 0.76 0.81 0.28 0.37 0.34 0.19 0.46 0.93 0.79 0.86 0.64 0.55 0.84 0.91 0.33 0.53 0.71 0.53 0.69 0.63 0.67 0.35 0.24 0.97 0.94 0.91 0.66 0.63 0.14 0.4 0.28 0.24 0.29 0.2 0.58 0.65 0.51 0.79 0.49 0.47 0.94 0.84 0.38 0.84 0.88 0.61 0.99 0.17 0.02 0.02 0.42 0.96 0.48 0.6 0.08 0.33 0.84 0.04 0.8 0.22 0.16 0.57
sigmoid function cost time:68ms
修改一下函数,先使用sigmoid的反函数unsigmoid计算prob_threshold,此时就不需要先遍历80个类寻找最高得分的类,也不会遇到切入第三个for循环后一定要进行两次sigmoid操作(计算confidence)的问题,只有当box_score > unsigmoid(prob_threshold)才会进行80类的max score查找,再计算bbox坐标,confidence等信息。
float unsigmoid(float x)
{
    return static_cast<float>(-1.0f * (float)log((1.0f / x) - 1.0f));
}

int unsig()
{
    int num_anchors = 3;
    int num_grid_y = 224;
    int num_grid_x = 224;
    float prob_threshold = 0.6;
    std::vector<float> num_class = ram_cls_num(80);
    un_prob = unsigmoid(prob_threshold)

    clock_t start, ends;
    start = clock();
    for (int q = 0; q < num_anchors; q++)
    {
        for (int i = 0; i < num_grid_y; i++)
        {
            for (int j = 0; j < num_grid_x; j++)
            {
                float tmp = i * num_grid_x + j;
                float box_score = rand() % (N + 1) / (float)(N + 1);
                // find class index with max class score
                if (box_score > un_prob )
                // 此处先用sigmoid的反函数绕过两次sigmoid,同时将前面的80类对比放至判断后面,不符合条件则不进行
                {
                    int class_index = 0;
                    float class_score = 0;

                    for (int k = 0; k < num_class.size(); k++)
                    {
                        float score = num_class[k];
                        if (score > class_score)
                        {
                            class_index = k;
                            class_score = score;
                        }
                    }

                    float confidence = sigmoid(box_score) * sigmoid(class_score);
                    if (confidence >= prob_threshold)
                    {
                        float dx = sigmoid(1);
                        float dy = sigmoid(2);
                        float dw = sigmoid(3);
                        float dh = sigmoid(4);
                    }
                }
            }
        }
    }
    ends = clock() - start;
    cout << "unsigmoid function cost time:" << ends << "ms" <<endl;
    return 0;
}
结果如下:
number class:
0.65 0.08 0.62 0.33 0.79 0.7 0.44 0 0.96 0.75 0.92 0.66 0.54 0.23 0.14 0.75 0.94 0.88 0.76 0.81 0.28 0.37 0.34 0.19 0.46 0.93 0.79 0.86 0.64 0.55 0.84 0.91 0.33 0.53 0.71 0.53 0.69 0.63 0.67 0.35 0.24 0.97 0.94 0.91 0.66 0.63 0.14 0.4 0.28 0.24 0.29 0.2 0.58 0.65 0.51 0.79 0.49 0.47 0.94 0.84 0.38 0.84 0.88 0.61 0.99 0.17 0.02 0.02 0.42 0.96 0.48 0.6 0.08 0.33 0.84 0.04 0.8 0.22 0.16 0.57
unsigmoid function cost time:77ms
sigmoid function cost time:69ms
unsigmoid function cost time:47ms
2.2 omp多并行
倘若后处理存在大量for循环,且循环不存在数据依赖和函数依赖关系,可以考虑使用openml库进行多线程并行加速,比如查找80类中score最高的类:
#pragma omp parallel for num_threads(ncnn::get_big_cpu_count())
for (int k = 0; k < num_class; k++) {
    float score = featptr[5 + k];
    if (score > class_score) {
    class_index = k;
    class_score = score;
    }
}
   #pragma omp parallel for num_threads(ncnn::get_big_cpu_count())
    for (int i = 0; i < count; i++) {
        objects[i] = proposals[picked[i]];

        // adjust offset to original unpadded
        float x0 = (objects[i].rect.x) / scale;
        float y0 = (objects[i].rect.y) / scale;
        float x1 = (objects[i].rect.x + objects[i].rect.width) / scale;
        float y1 = (objects[i].rect.y + objects[i].rect.height) / scale;

        // clip
        x0 = std::max(std::min(x0, (float) (img_w - 1)), 0.f);
        y0 = std::max(std::min(y0, (float) (img_h - 1)), 0.f);
        x1 = std::max(std::min(x1, (float) (img_w - 1)), 0.f);
        y1 = std::max(std::min(y1, (float) (img_h - 1)), 0.f);

        objects[i].rect.x = x0;
        objects[i].rect.y = y0;
        objects[i].rect.width = x1 - x0;
        objects[i].rect.height = y1 - y0;
    }
经过以上修改后的模型检测效果如下:
xiaomi 10+CPU(Snapdragon 865):

redmi K30+CPU(Snapdragon 730G):

代码链接:https://github.com/ppogg/ncnn-android-v5lite
Welcome star and fork~
本文总阅读量次