介绍
Vision Transformer!的提出让我们看到了Transformer模型在图像方向的潜力,但其有一些缺点,如需要超大型数据集(JFT)预训练,才能达到现在CNN的精度。本文分析了ViT的一些不合理之处:
- 直接将图片分块展开成一维向量不利于对图片结构信息(如边缘,线条)建模
- 冗余的Attention模块限制了特征表达,并带来运算负担
基于上述两点,本文提出Tokens to Token Transformer,采用类似CNN中卷积划窗的方式,将相邻的tokens局部聚合起来,有助于建模局部特征。另外还设计了一种deep narrow(个人理解是 深+窄 的网络结构)结构,减少了运算量,并获得性能上的提升。
特征可视化分析
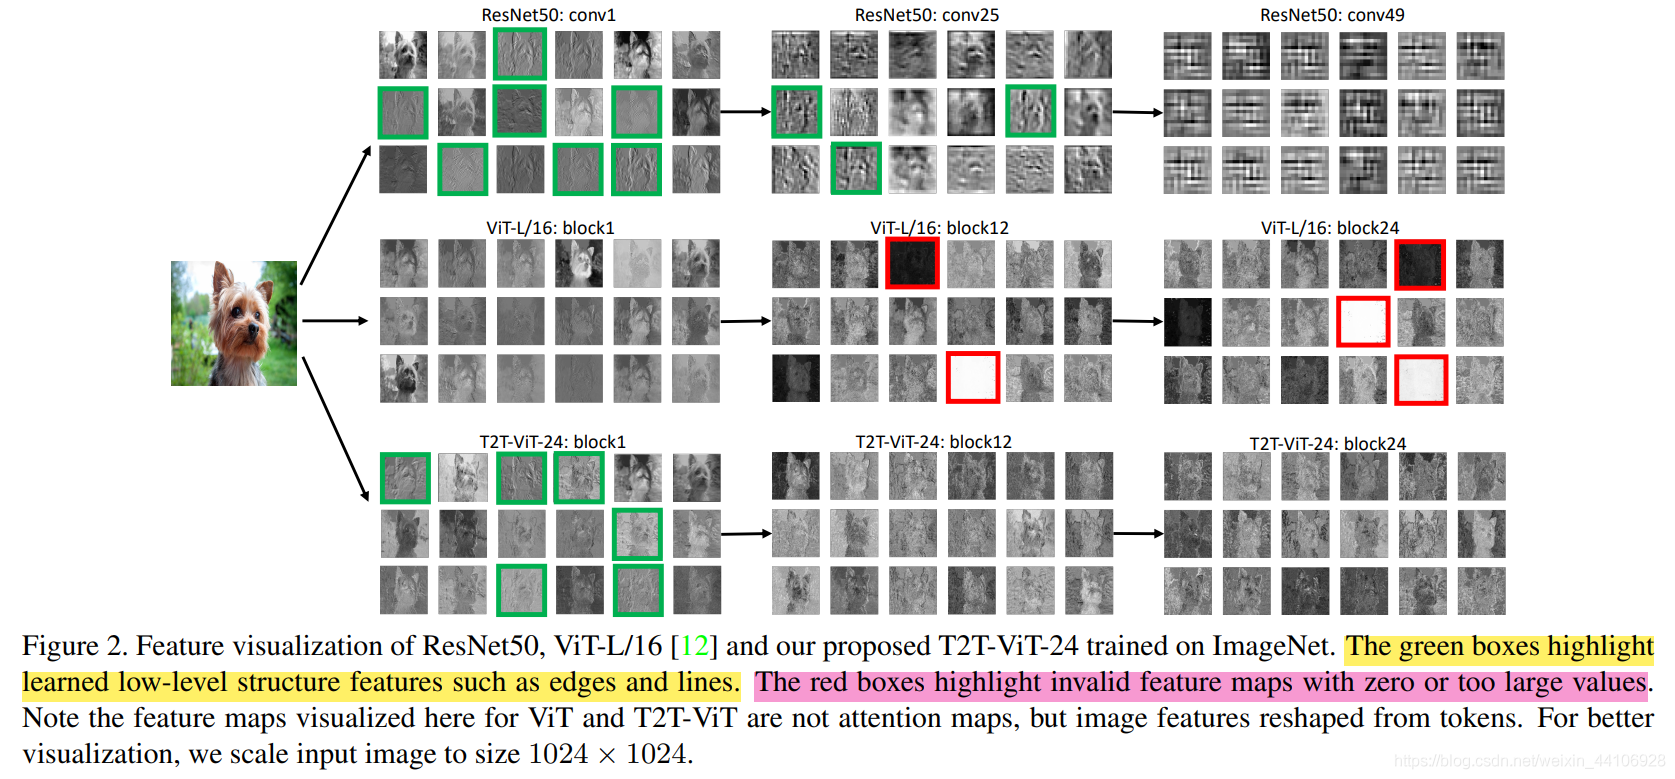
本文先分析了Resnet50,Vision Transformer,T2T Transformer的特征可视化。 其中绿框标注的是浅层特征,如边缘,线条。红框标注的是一些零值或过大值。
我们先从熟悉的CNN看起,在比较浅的层中,网络学习到的更多是结构信息,比如对这只小狗边缘的刻画。随着层数加深,通道数变深,特征也越来越抽象(conv50我反正是看不出是什么)。
再来看ViT,他每层都能很好的建模全局信息,即使是很深的层当中,也没有所谓非常抽象的东西。但它对结构信息捕捉的很少,(个人认为是没有类似CNN卷积核划窗的操作,导致对局部信息捕捉不够?)。除此之外,在一些特征图出现了极值,如全白和全黑的特征,对于最终预测可能是没有贡献的。
最后看下T2T,通过Token to Token结构(下文会讲),它在浅层的时候也能建模出结构信息,同时也避免了极值的出现。
Tokens To Token结构
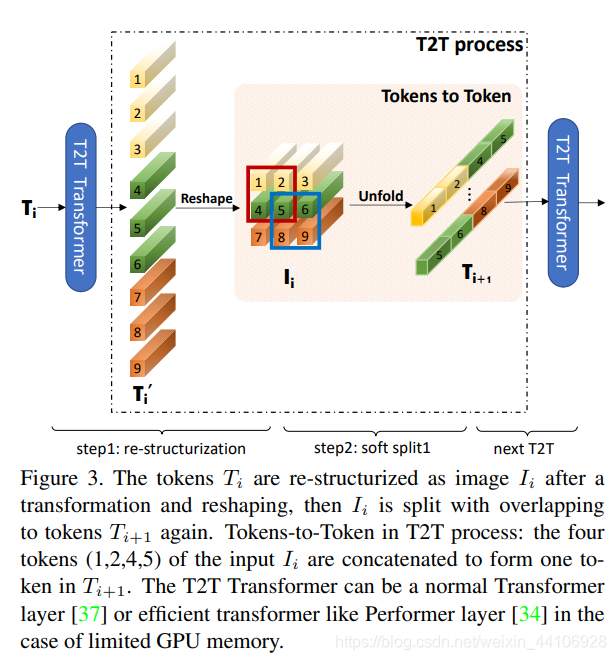
Vision Transformer是将二维图片展平成一维向量(也叫token),然后送入到Transoformer结构里。而T2T为了捕捉局部信息,它将所有的token通过reshape操作,恢复成二维,然后利用一个unfold一个划窗操作,属于一个窗口的tokens,会连接成一个更长的token,然后送入到Transformer中。
这样会逐渐减少token的数量,但随之而来token的长度会增加很多(因为多个tokens连接在一个token),因此后续模型也降低了维度数目,以平衡计算量。
关于Unfold操作
Unfold操作其实就是卷积中用到的img2col方法,将一个卷积窗口的向量,重排成一个列向量。
下面是一段测试代码
import torch
import numpy as np

np_input = np.array([[[[1, 2, 3],
                       [4, 5, 6],
                       [7, 8, 9]],
                     [[10, 11, 12],
                      [13, 14, 15],
                      [16, 17, 18]],
                     [[19, 20, 21],
                      [22, 23, 24],
                      [25, 26, 27]],
                     [[28, 29, 30],
                      [31, 32, 33],
                      [34, 35, 36]]]]).astype(np.float32)

torch_input = torch.Tensor(np_input)

unfold = torch.nn.Unfold(kernel_size=2, padding=0, stride=1)
unfolded = unfold(torch_input)

print(unfolded)

# 输出为
tensor([[[ 1.,  2.,  4.,  5.],
         [ 2.,  3.,  5.,  6.],
         [ 4.,  5.,  7.,  8.],
         [ 5.,  6.,  8.,  9.],
         [10., 11., 13., 14.],
         [11., 12., 14., 15.],
         [13., 14., 16., 17.],
         [14., 15., 17., 18.],
         [19., 20., 22., 23.],
         [20., 21., 23., 24.],
         [22., 23., 25., 26.],
         [23., 24., 26., 27.],
         [28., 29., 31., 32.],
         [29., 30., 32., 33.],
         [31., 32., 34., 35.],
         [32., 33., 35., 36.]]])
这是对应的示意图

整体架构

T2T架构如上图所示,先经过2次Tokens to Token操作,最后给token加入用于图像分类的cls token,并给上位置编码(position embedding),送入到Backbone当中。
Backbone设计探索
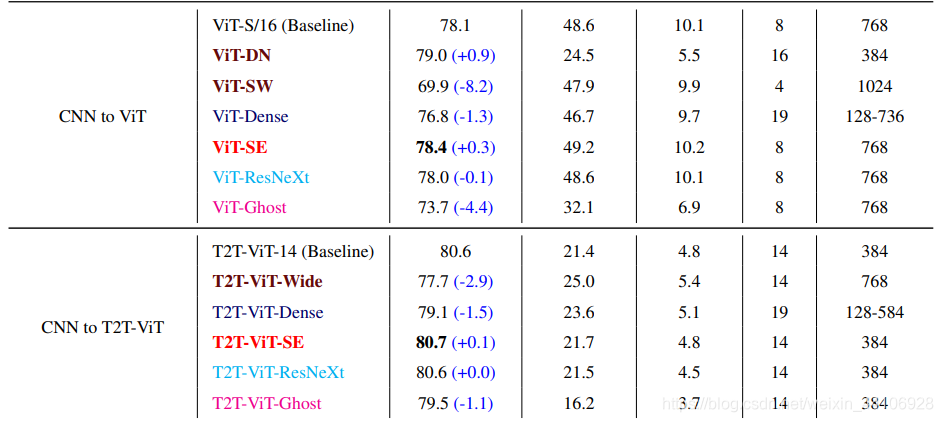
现今CNN探索出了很多结构,比如Resnet残差结构,DenseNet密集连接,GhostNet生成冗余特征,SE注意力模块,ResNext多头分组卷积等。作者基于这些思想进行了一系列模型设计,实验,最终结论如下
- 更深更窄(Deep Narrow)的ViT结构比更浅更宽(Shallow Wide )的性能更好
- DenseNet的密集concat结构均使ViT和T2T-ViT性能下降
- SE注意力模块均能提升ViT和T2T-ViT的性能
- ResNext结构对于ViT和T2T-ViT的性能提升很微弱
- GhostNet结构可以进一步压缩模型大小,但同样会损失一定性能 基于上述实验,作者选择了Deep Narrow的结构形式
代码解读
Token Transformer
class Token_transformer(nn.Module):

    def __init__(self, dim, in_dim, num_heads, mlp_ratio=1., qkv_bias=False, qk_scale=None, drop=0., attn_drop=0.,
                 drop_path=0., act_layer=nn.GELU, norm_layer=nn.LayerNorm):
        super().__init__()
        self.norm1 = norm_layer(dim)
        self.attn = Attention(
            dim, in_dim=in_dim, num_heads=num_heads, qkv_bias=qkv_bias, qk_scale=qk_scale, attn_drop=attn_drop, proj_drop=drop)
        self.drop_path = DropPath(drop_path) if drop_path > 0. else nn.Identity()
        self.norm2 = norm_layer(in_dim)
        self.mlp = Mlp(in_features=in_dim, hidden_features=int(in_dim*mlp_ratio), out_features=in_dim, act_layer=act_layer, drop=drop)

    def forward(self, x):
        x = self.attn(self.norm1(x))
        x = x + self.drop_path(self.mlp(self.norm2(x)))
        return x
整体结构很简单,输入经过一次LayerNorm,然后输入到Attention多头注意力模块。输出再次经过LayerNorm,最后设置一定比例的Dropout
T2T Module
class T2T_module(nn.Module):
    """
    Tokens-to-Token encoding module
    """

    def __init__(self, img_size=224, tokens_type='performer', in_chans=3, embed_dim=768, token_dim=64):
        super().__init__()

        if tokens_type == 'transformer':
            print('adopt transformer encoder for tokens-to-token')
            self.soft_split0 = nn.Unfold(kernel_size=(7, 7), stride=(4, 4), padding=(2, 2))
            self.soft_split1 = nn.Unfold(kernel_size=(3, 3), stride=(2, 2), padding=(1, 1))
            self.soft_split2 = nn.Unfold(kernel_size=(3, 3), stride=(2, 2), padding=(1, 1))

            self.attention1 = Token_transformer(dim=in_chans * 7 * 7, in_dim=token_dim, num_heads=1, mlp_ratio=1.0)
            self.attention2 = Token_transformer(dim=token_dim * 3 * 3, in_dim=token_dim, num_heads=1, mlp_ratio=1.0)
            self.project = nn.Linear(token_dim * 3 * 3, embed_dim)

        elif tokens_type == 'performer':
            ...
        elif tokens_type == 'convolution':  # just for comparison with conolution, not our model
            # for this tokens type, you need change forward as three convolution operation
            ...
        self.num_patches = (img_size // (4 * 2 * 2)) * (
                    img_size // (4 * 2 * 2))  # there are 3 sfot split, stride are 4,2,2 seperately
    def forward(self, x):
        # step0: soft split
        x = self.soft_split0(x).transpose(1, 2)

        # iteration1: restricturization/reconstruction
        x = self.attention1(x)
        B, new_HW, C = x.shape
        x = x.transpose(1, 2).reshape(B, C, int(np.sqrt(new_HW)), int(np.sqrt(new_HW)))
        # iteration1: soft split
        x = self.soft_split1(x).transpose(1, 2)

        # iteration2: restricturization/reconstruction
        x = self.attention2(x)
        B, new_HW, C = x.shape
        x = x.transpose(1, 2).reshape(B, C, int(np.sqrt(new_HW)), int(np.sqrt(new_HW)))
        # iteration2: soft split
        x = self.soft_split2(x).transpose(1, 2)

        # final tokens
        x = self.project(x)

        return x
首先设置三个划窗大小分别为7x7, 3x3, 3x3的Unfold操作,和两个Token Transformer模块。
假设输入数据格式是
在forward中,先进行一次soft_split操作,数据变为
然后进行一次transpose操作,将通道维调整到最后一维度
送入到Attention模块后,再把通道维调整回来
最后reshape成4维数据
再重复上述类似的步骤,最后经过一个全连接层,调整通道数到合适的Embedding dim。
T2T ViT
这是整体结构的代码
class T2T_ViT(nn.Module):
    def __init__(self, img_size=224, tokens_type='performer', in_chans=3, num_classes=1000, embed_dim=768, depth=12,
                 num_heads=12, mlp_ratio=4., qkv_bias=False, qk_scale=None, drop_rate=0., attn_drop_rate=0.,
                 drop_path_rate=0., norm_layer=nn.LayerNorm):
        super().__init__()
        self.num_classes = num_classes
        self.num_features = self.embed_dim = embed_dim  # num_features for consistency with other models

        self.tokens_to_token = T2T_module(
            img_size=img_size, tokens_type=tokens_type, in_chans=in_chans, embed_dim=embed_dim)
        num_patches = self.tokens_to_token.num_patches

        self.cls_token = nn.Parameter(torch.zeros(1, 1, embed_dim))
        self.pos_embed = nn.Parameter(data=get_sinusoid_encoding(n_position=num_patches + 1, d_hid=embed_dim),
                                      requires_grad=False)
        self.pos_drop = nn.Dropout(p=drop_rate)

        dpr = [x.item() for x in torch.linspace(0, drop_path_rate, depth)]  # stochastic depth decay rule
        self.blocks = nn.ModuleList([
            Block(
                dim=embed_dim, num_heads=num_heads, mlp_ratio=mlp_ratio, qkv_bias=qkv_bias, qk_scale=qk_scale,
                drop=drop_rate, attn_drop=attn_drop_rate, drop_path=dpr[i], norm_layer=norm_layer)
            for i in range(depth)])
        self.norm = norm_layer(embed_dim)

        # Classifier head
        self.head = nn.Linear(embed_dim, num_classes) if num_classes > 0 else nn.Identity()

        trunc_normal_(self.cls_token, std=.02)
        self.apply(self._init_weights)

    ...忽略一些其他的方法

    def forward_features(self, x):
        B = x.shape[0]
        x = self.tokens_to_token(x)

        cls_tokens = self.cls_token.expand(B, -1, -1)
        x = torch.cat((cls_tokens, x), dim=1)
        x = x + self.pos_embed
        x = self.pos_drop(x)

        for blk in self.blocks:
            x = blk(x)

        x = self.norm(x)
        return x[:, 0]

    def forward(self, x):
        x = self.forward_features(x)
        x = self.head(x)
        return x
整个架构是将输入数据通过T2Tmodule,然后设立一个分类的token(cls_tokens),将其concat到x中,并加入position embedding(这里是用一个可学习参数作为位置编码)。处理好后,输入到一个个叠起来的Transformer Block,最后取第一个token(也就是cls_tokens),输入到分类层,得到最终结果。
总结
依图科技近期也开源了相关代码 yitu-opensource/ T2T-ViT,大家有兴趣的话可以试验下代码。
个人感觉这篇论文还是偏工程化的,通过分析初版Vision Transformer的缺点,提出T2T结构,并且在BackBone上,以CNN的视角重新探索,将CNN的优点结合起来,最终效果也是十分不错的,期待后续CNN结合Transformer的相关工作。
欢迎关注GiantPandaCV, 在这里你将看到独家的深度学习分享,坚持原创,每天分享我们学习到的新鲜知识。( • ̀ω•́ )✧
有对文章相关的问题,或者想要加入交流群,欢迎添加BBuf微信:

为了方便读者获取资料以及我们公众号的作者发布一些Github工程的更新,我们成立了一个QQ群,二维码如下,感兴趣可以加入。

本文总阅读量次