FFCV:让数据加载不再是训练模型的瓶颈
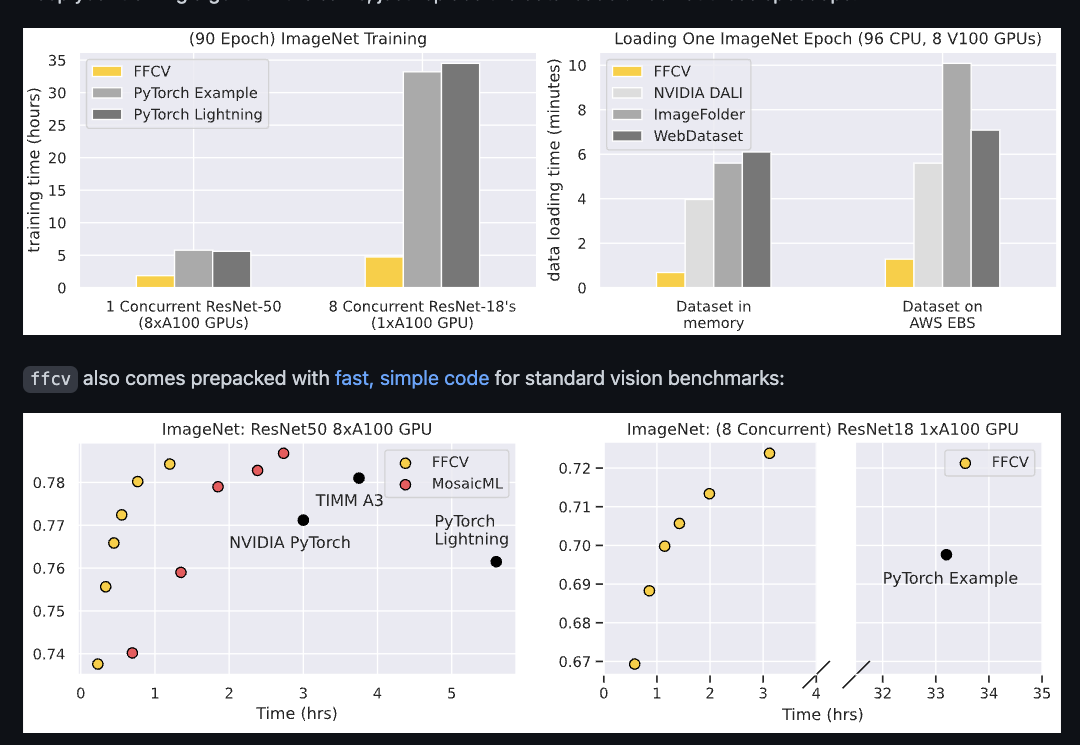
前段时间逛GitHub看到FFCV这个库,该库主要是优化数据加载过程来提升整体训练速度。其中也放出了一些benchmark,看上去比其他优化库如DALI,PyTorch Lightening要快的不少。

一方面自己是搞框架的,数据加载优化是其中一部分重头戏;另一方面是PyTorch的数据加载速度也被诟病很久,毕竟面对的是研究人员,大部分人都是直接opencv, PIL一把梭哈数据预处理,我也很好奇如果好好写这部分能对PyTorch的速度提升多少,遂写这篇文章想分析分析(如有分析不对的地方还望指正)。
代码地址:https://github.com/libffcv/ffcv
快速上手
这里以提炼官方文档为主
制作数据集
FFCV数据集是一个自定义格式.beton,所以第一步就需要将你的数据集转换成该格式。
这里我们以制作可索引数据集为例,首先创建一个支持索引的Dataset对象,你需要重写__getitem__和__len__方法
import numpy as np

class LinearRegressionDataset:
    def __init__(self, N, d):
        self.X = np.random.randn(N, d)
        self.Y = np.random.randn(N)

    def __getitem__(self, idx):
        return (self.X[idx].astype('float32'), self.Y[idx])

    def __len__(self):
        return len(self.X)

N, d = (100, 6)
dataset = LinearRegressionDataset(N, d)
接着调用DatasetWriter将你的Dataset写成.beton格式
from ffcv.fields import NDArrayField, FloatField

writer = DatasetWriter(write_path, {
    'covariate': NDArrayField(shape=(d,), dtype=np.dtype('float32')),
    'label': FloatField(),

}, num_workers=16)
- write_path 数据集要写入的路径
- 字典,其中value项是你数据对应的一个Field对象。对应我们的数据集,每个X是一个ndarray,所以对应的是NDArrayField; 而Y则是一个浮点数,对应FloatField
使用DataLoader
制作好数据集我们就可以用了,这里的DataLoader其实是和PyTorch的很相似,使用方法如下
loader = Loader('/path/to/dataset.beton',
                batch_size=BATCH_SIZE,
                num_workers=NUM_WORKERS,
                order=ORDERING,
                pipelines=PIPELINES)
- order 决定数据读取的顺序
- pipelines 数据预处理的pipeline,我们可以把数据增广操作组合成一个pipeline传进来
pipeline一个组合示例如下:
image_pipeline: List[Operation] = [
    SimpleRGBImageDecoder(),
    RandomHorizontalFlip(),
    torchvision.transforms.ColorJitter(.4,.4,.4),
    RandomTranslate(padding=2),
    ToTensor(),
    ToDevice('cuda:0', non_blocking=True),
    ToTorchImage(),
    Convert(ch.float16),
    torchvision.transforms.Normalize(MEAN, STD), # Normalize using image statistics
])
其构造主要分为以下几个大块:
- libffcv 自己写的一套C扩展
- ffcv python库主体
  |- fields 数据结构
  |- loader 数据加载器
  |- memory_manager 内存管理器
  |- pipeline 数据处理流水线
  |- transformer 增广操作
  |- traversal_order 数据遍历顺序控制
libffcv
作者基于Python C扩展写了一些必要的函数,包括如memcpy,fileread,imdecode,resize
其中resize使用的是Opencv来做,而图片解码采用的是turbojpeg库
fields
fields是ffcv里的数据结构,每个dataset的一个数据,是由一个或多个fields组成,每个field需要实现各自的编码,解码逻辑,分别对应数据集的写入,读取操作。
以FloatField为例:
class FloatField(Field):
    """
    A subclass of :class:`~ffcv.fields.Field` supporting (scalar) floating-point (float64)
    values.
    """
    def __init__(self):
        pass

    @property
    def metadata_type(self) -> np.dtype:
        return np.dtype('<f8')

    @staticmethod
    def from_binary(binary: ARG_TYPE) -> Field:
        return FloatField()

    def to_binary(self) -> ARG_TYPE:
        return np.zeros(1, dtype=ARG_TYPE)[0]

    def encode(self, destination, field, malloc):
        destination[0] = field

    def get_decoder_class(self) -> Type[Operation]:
        return FloatDecoder
loader
ffcv loader对标 PyTorch DataLoader:
class Loader:
    def __init__(self,
                 fname: str,
                 batch_size: int,
                 num_workers: int = -1,
                 os_cache: bool = DEFAULT_OS_CACHE,
                 order: ORDER_TYPE = OrderOption.SEQUENTIAL,
                 distributed: bool = False,
                 seed: int = None,  # For ordering of samples
                 indices: Sequence[int] = None,  # For subset selection
                 pipelines: Mapping[str,
                                    Sequence[Union[Operation, ch.nn.Module]]] = {},
                 custom_fields: Mapping[str, Type[Field]] = {},
                 drop_last: bool = True,
                 batches_ahead: int = 3,
                 recompile: bool = False,  # Recompile at every epoch
                 ):
- os_cache 缓存策略
- order 数据读取顺序
- pipelines 数据预处理流水线,ffcv将所有的数据预处理集中到一个pipeline,然后借助JIT来加速相关处理操作
- recompile 前面提到过他用JIT来加速预处理操作,当你每个epoch所对应的操作不一样,那么你就需要重新用JIT编译相关操作
memory_manager
这是一个内存管理对象,当数据集能够完全放进内存中时,则可以通过memory_manager设置相关策略,具体有两种策略。
一种是当内存充裕的时候,使用OS级别的cache,这里借助了np.memmap来完成虚拟内存和磁盘数据的映射,当出现缺页异常再执行相关的拷贝操作。
class OSCacheContext(MemoryContext):
    def __init__(self, manager:MemoryManager):
        self.manager = manager
        self.mmap = None

    @property
    def state(self):
        return (self.mmap, self.manager.ptrs, self.manager.sizes)

    def __enter__(self):
        res = super().__enter__()
        if self.mmap is None:
            self.mmap = np.memmap(self.manager.reader.file_name,
                                  'uint8', mode='r')
        return res

    # ...
另一种则是用进程级别的cache,维护固定数量的page,每一个batch释放相关的page,并对下一轮的数据进行预取prefetch。
# We now find how many pages we need to keep in our buffer
     # We also determine where which page is going to reside
    next_slot = 0
    page_to_slot = {}
    free_slots = set()

    # For each batch
    for b_id in range(len(pages_in_batch)):
        # First we free the pages that are leaving
        for page in leaving_at[b_id]:
            free_slots.add(page_to_slot[page])

        # We use the prefetch timing here because we want to be able
        # To start prefetching ahead of time and not overwrite a slot
        # That is currently used
        for page in can_prefetch_at[b_id]:
            # Then we find a slot for the incoming pages
            if free_slots:
                # There is a slot available for this page
                slot = free_slots.pop()
            else:
                # We have to allocate a new slot because we ran out
                slot = next_slot
                next_slot += 1

            page_to_slot[page] = slot

    return Schedule(next_slot, page_to_slot,
                    can_prefetch_at, entering_at, leaving_at)
Pipeline
里面具体有分了几个小部分
Operation
这是一个定义数据预处理操作的基类,其中generate_code方法用于返回相关处理操作的代码,以便后续被jit编译加速
class Operation(ABC):

    def __init__(self):
        self.matadata: np.ndarray = None
        self.memory_read: Callable[[np.uint64], np.ndarray] = None
        pass

    # ...

    @abstractmethod
    def declare_state_and_memory(self, previous_state: State) -> Tuple[State, Optional[AllocationQuery]]:
        raise NotImplementedError
Compiler
顾名思义这是一个数据加载操作的"编译器",其思路就是利用numba.njit来将相关预处理操作编译,进行加速
class Compiler:

    @classmethod
    def set_enabled(cls, b):
        cls.is_enabled = b

    @classmethod
    def set_num_threads(cls, n):
        if n < 1 :
            n = cpu_count()
        cls.num_threads = n
        set_num_threads(n)
        ch.set_num_threads(n)

    @classmethod
    def compile(cls, code, signature=None):
        parallel = False
        if hasattr(code, 'is_parallel'):
            parallel = code.is_parallel and cls.num_threads > 1

        if cls.is_enabled:
            return njit(signature, fastmath=True, nogil=True, error_model='numpy',
                        parallel=parallel)(code)
        return code
fast_math默认开启,在一些浮点数的情形下可能会出现与普通计算不一致的情况(来自多年Loss对齐的惨痛教训)
然后我们看下 pipeline 主体代码,这是数据预处理的流水线,主要操作是:
- 解析流水线
传进来的是一系列Operation的组合,需要先调用declare_state_and_memory来分配Operation对应的state和所需memory:
def parse_pipeline(self, batch_size=16):
        memory_allocations: Mapping[int, Optional[Allocation]] = {}
        operation_blocs = []

        current_state: State = self.original_state
        current_block = []

        # We read the content of the pipeline, validate and collect
        # Memory allocations
        for op_id, operation in enumerate(self.operations):
            previous_state = current_state
            current_state, memory_allocation = operation.declare_state_and_memory(
                current_state)

            if current_state.jit_mode != previous_state.jit_mode:
                if current_block:
                    operation_blocs.append((previous_state.jit_mode, current_block))
                current_block = [op_id]
            else:
                current_block.append(op_id)

            memory_allocations[op_id] = memory_allocation

        if current_block:
            operation_blocs.append((current_state.jit_mode, current_block))

        return operation_blocs, memory_allocations
- 编译Operation代码
这部分很简单,就是逐个调用每个Operation的generate_code方法
def compile_ops(self):
    compiled_ops = {}
    for op_id, operation in enumerate(self.operations):
        compiled_ops[op_id] = operation.generate_code()
    return compiled_ops
Transform
这里是数据增广操作部分,通过继承Operation类,来重写generate_code逻辑。
以常用的ImageMixup为例:
class ImageMixup(Operation):
    def __init__(self, alpha: float, same_lambda: bool):
        super().__init__()
        self.alpha = alpha
        self.same_lambda = same_lambda

    def generate_code(self) -> Callable:
        alpha = self.alpha
        same_lam = self.same_lambda
        my_range = Compiler.get_iterator()

        def mixer(images, dst, indices):
            np.random.seed(indices[-1])
            num_images = images.shape[0]
            lam = np.random.beta(alpha, alpha) if same_lam else \
                  np.random.beta(alpha, alpha, num_images)
            for ix in my_range(num_images):
                l = lam if same_lam else lam[ix]
                dst[ix] = l * images[ix] + (1 - l) * images[ix - 1]

            return dst

        mixer.is_parallel = True
        mixer.with_indices = True

        return mixer

    def declare_state_and_memory(self, previous_state: State) -> Tuple[State, Optional[AllocationQuery]]:
        return (previous_state, AllocationQuery(shape=previous_state.shape,
                                                dtype=previous_state.dtype))

作者在Reddit上的一些讨论还提到了,他们实现了一个更快版本的NormalizeImage操作,对应的代码是在:https://github.com/libffcv/ffcv/blob/main/ffcv/transforms/normalize.py
实现具体分GPU和CPU版本,我们关注下GPU版本:
    def __init__(self, mean: np.ndarray, std: np.ndarray,
                 type: np.dtype):
        super().__init__()
        table = (np.arange(256)[:, None] - mean[None, :]) / std[None, :]
        # ...

    def generate_code_gpu(self) -> Callable:

        # We only import cupy if it's truly needed
        import cupy as cp
        import pytorch_pfn_extras as ppe

        tn = np.zeros((), dtype=self.dtype).dtype.name
        kernel = cp.ElementwiseKernel(f'uint8 input, raw {tn} table', f'{tn} output', 'output = table[input * 3 + i % 3];')
        final_type = ch_dtype_from_numpy(self.original_dtype)
        s = self
        def normalize_convert(images, result):
            B, C, H, W = images.shape
            table = self.lookup_table.view(-1)
            assert images.is_contiguous(memory_format=ch.channels_last), 'Images need to be in channel last'
            result = result[:B]
            result_c = result.view(-1)
            images = images.permute(0, 2, 3, 1).view(-1)

            current_stream = ch.cuda.current_stream()
            with ppe.cuda.stream(current_stream):
                kernel(images, table, result_c)

            # Mark the result as channel last
            final_result = result.reshape(B, H, W, C).permute(0, 3, 1, 2)

            assert final_result.is_contiguous(memory_format=ch.channels_last), 'Images need to be in channel last'

            return final_result.view(final_type)

        return normalize_convert
比如 mean = [127.5, 127.5, 127.5], std = [1, 1, 1],那么得到的table shape为(256, 3),其中256代表着uint8像素值从0-255,而3代表的是RGB三个通道,数据为
[[-127.5 -127.5 -127.5] # 像素值为0,RGB三个通道对应的normalized值
 [-126.5 -126.5 -126.5]
 ...
]
此时这个查找表是channel_last形式,我们用view把他展平:
table = self.lookup_table.view(-1)
基于表是channel_last形式,那对应的NCHW输入图片我们也要进行transpose,变成对应的NHWC并展平(我猜是为了后续访问连续,从而提升性能):
images = images.permute(0, 2, 3, 1).view(-1)
然后就可以调用cupy的ElementwiseKernel,进行逐元素操作:
kernel = cp.ElementwiseKernel(f'uint8 input, raw {tn} table', f'{tn} output', 'output = table[input * 3 + i % 3];')
其中input是输入像素值,i是index,这里对3取余得到具体是 RGB 3个通道中的哪一个。
总结
FFCV这个库还是挺不错的,不需要很多HPC知识,不需要你会写算子,通过比较成熟的一些工具来实现数据加载的加速,兼顾了PyTorch DataLoader的灵活性,同时又有较高的性能。
这个库到现在已经有1.5k star了,不得不说PyTorch的生态实在是好,基于其衍生出来的拓展库层出不穷。但也侧面反应出一些问题,需要依靠社区的力量来去完善。这个库给我们带来了很多新思路,有兴趣的朋友可以试试。
本文总阅读量次