0x00. 前言
上篇文章系统的介绍了TVM Pass Infra,并解析了Relay树结构以及Constant Folding Pass的具体做法。这一节,我想先补充一下TVM Pass Infra的用法,接着介绍一下TVM算符融合需要用到的支配树这个数据结构,最后再深入分析TVM中的一个非常重要的Pass即算符融合。
0x01. 如何使用TVM Pass Infra
关于TVM Pass Infra的介绍可以移步【从零开始学深度学习编译器】七,万字长文入门TVM Pass查看。这里来介绍一下TVM Pass Infra的使用方法,内容翻译自https://tvm.apache.org/docs/tutorials/dev/use_pass_infra.html,加了一些自己的理解。
随着 Relay/tir 中优化pass次数的增加,手动执行它们并维护它们的依赖关系变得棘手。 因此,我们引入了一个Pass基础设施来管理优化passes,并使其适用于 TVM 栈中不同层的 IR。
Relay/tir 程序的优化Pass可以应用于各种粒度,即分别使用 tvm.relay.transform.FunctionPass/tvm.tir.transform.PrimFuncPass 和 tvm.transform.ModulePass 的function-level和module-level级别的优化pass。 或者用户可以依靠 tvm.transform.Sequential 在 Relay/tir 程序上应用一系列passes,其中passes之间的依赖关系可以通过Pass Infra解决。
这里主要是来演示一些开发人员如何使用Pass Infra来进行某种优化,并为Relay程序创建优化管道。这里的方法同样适用于tir。首先导入一些必要的包。
import numpy as np
import tvm
from tvm import te
import tvm.relay as relay
接下来,展示了一个简单的Relay程序,该程序将用于执行各种实例Pass的例子。同样,用户也可以编写一个tir原始函数并应用Pass。
创建一个Relay 程序示例
def example():
    shape = (1, 64, 54, 54)
    c_data = np.empty(shape).astype("float32")
    c = relay.const(c_data)
    weight = relay.var("weight", shape=(64, 64, 3, 3))
    x = relay.var("x", relay.TensorType((1, 64, 56, 56), "float32"))
    conv = relay.nn.conv2d(x, weight)
    y = relay.add(c, c)
    y = relay.multiply(y, relay.const(2, "float32"))
    y = relay.add(conv, y)
    z = relay.add(y, c)
    z1 = relay.add(y, c)
    z2 = relay.add(z, z1)
    return relay.Function([x, weight], z2)
然后这里给一个conv op注册一个输出数据排布更改的Pass,这个Pass将卷积层的NCHW数据排布变化成NCHW16c的数据排布。
@relay.op.register_alter_op_layout("nn.conv2d", level=101)
def alter_conv2d(attrs, inputs, tinfos, out_type):
    data, weight = inputs
    new_attrs = dict(attrs)
    new_attrs["data_layout"] = "NCHW16c"
    return relay.nn.conv2d(data, weight, **new_attrs)
优化程序
在应用Pass之前我们看一下Relay程序长什么样:
def @main(%x: Tensor[(1, 64, 56, 56), float32], %weight: Tensor[(64, 64, 3, 3), float32]) {
  %0 = add(meta[relay.Constant][0], meta[relay.Constant][0]);
  %1 = nn.conv2d(%x, %weight, padding=[0, 0, 0, 0]);
  %2 = multiply(%0, 2f);
  %3 = add(%1, %2);
  %4 = add(%3, meta[relay.Constant][0]);
  %5 = add(%3, meta[relay.Constant][0]);
  add(%4, %5)
}
现在我们要优化程序。 Relay 具有许多优化功能。 我们将选择其中的一些应用到这个示例程序中。
手动应用优化Passes,这里使用一个FoldConstant的Pass。
# Let's first create a relay Module which contains one or multiple Relay
# functions for optimization.
f = example()
mod = tvm.IRModule.from_expr(f)

# Now we can apply constant folding on the module.
# fold_const here is a callback that doesn't take any parameters.
fold_const = relay.transform.FoldConstant()
# Then, we can invoke the pass on the given module. Note that the constant
# folding pass works at the function-level. That being said, each function in
# the module will be applied with the optimization. Users don't need to iterate
# through individual functions manually to apply this pass.
mod = fold_const(mod)
# We can see from the updated program that the constants are folded.
print(mod)
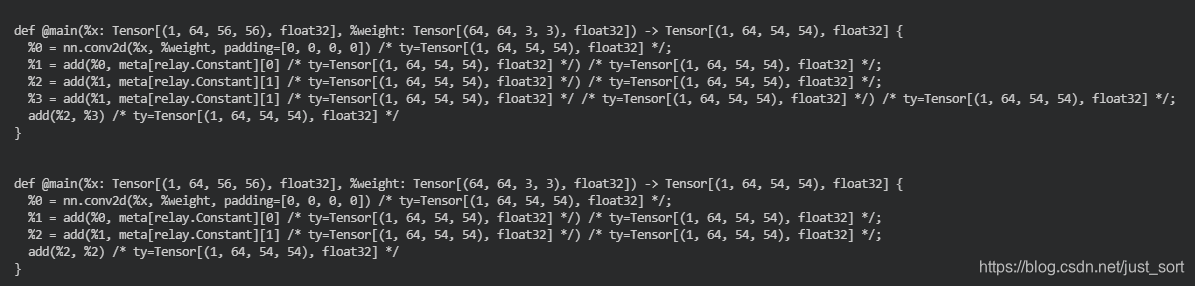
应用了FoldConstant Pass之后Relay程序长这样:
def @main(%x: Tensor[(1, 64, 56, 56), float32], %weight: Tensor[(64, 64, 3, 3), float32]) -> Tensor[(1, 64, 54, 54), float32] {
  %0 = nn.conv2d(%x, %weight, padding=[0, 0, 0, 0]) /* ty=Tensor[(1, 64, 54, 54), float32] */;
  %1 = add(%0, meta[relay.Constant][0] /* ty=Tensor[(1, 64, 54, 54), float32] */) /* ty=Tensor[(1, 64, 54, 54), float32] */;
  %2 = add(%1, meta[relay.Constant][1] /* ty=Tensor[(1, 64, 54, 54), float32] */) /* ty=Tensor[(1, 64, 54, 54), float32] */;
  %3 = add(%1, meta[relay.Constant][1] /* ty=Tensor[(1, 64, 54, 54), float32] */ /* ty=Tensor[(1, 64, 54, 54), float32] */) /* ty=Tensor[(1, 64, 54, 54), float32] */;
  add(%2, %3) /* ty=Tensor[(1, 64, 54, 54), float32] */
}
可以看到相对于优化之前的IR,应用了FoldConstant Pass之后初始IR的%2 = multiply(%0, 2f);由于是一个常量直接被折叠起来变成了relay.Constant][1]。接下来可以以类似的方式应用更多优化。 例如,我们可以消除 z 和 z1 使用的公共表达式,即使用EliminateCommonSubexpr Pass。
mod = relay.transform.EliminateCommonSubexpr()(mod)
print(mod)
看下面的图就很清晰了。
一些优化,例如fuse,也是带一些配置参数的。 例如,opt_level 0 将不允许运算融合在一起。 用户可以通过fuse_opt_level来启用它。
mod = relay.transform.FuseOps(fuse_opt_level=0)(mod)

# We can observe that the optimized module contains functions that only have
# a signle primitive op.
print(mod)
这样IR就会是下面展示的样子:
def @main(%x: Tensor[(1, 64, 56, 56), float32], %weight: Tensor[(64, 64, 3, 3), float32]) -> Tensor[(1, 64, 54, 54), float32] {
  %0 = fn (%p03: Tensor[(1, 64, 56, 56), float32], %p12: Tensor[(64, 64, 3, 3), float32], Primitive=1) -> Tensor[(1, 64, 54, 54), float32] {
    nn.conv2d(%p03, %p12, padding=[0, 0, 0, 0]) /* ty=Tensor[(1, 64, 54, 54), float32] */
  };
  %1 = %0(%x, %weight) /* ty=Tensor[(1, 64, 54, 54), float32] */;
  %2 = fn (%p02: Tensor[(1, 64, 54, 54), float32], %p11: Tensor[(1, 64, 54, 54), float32], Primitive=1) -> Tensor[(1, 64, 54, 54), float32] {
    add(%p02, %p11) /* ty=Tensor[(1, 64, 54, 54), float32] */
  };
  %3 = %2(%1, meta[relay.Constant][0] /* ty=Tensor[(1, 64, 54, 54), float32] */) /* ty=Tensor[(1, 64, 54, 54), float32] */;
  %4 = fn (%p01: Tensor[(1, 64, 54, 54), float32], %p1: Tensor[(1, 64, 54, 54), float32], Primitive=1) -> Tensor[(1, 64, 54, 54), float32] {
    add(%p01, %p1) /* ty=Tensor[(1, 64, 54, 54), float32] */
  };
  %5 = %4(%3, meta[relay.Constant][1] /* ty=Tensor[(1, 64, 54, 54), float32] */) /* ty=Tensor[(1, 64, 54, 54), float32] */;
  %6 = fn (%p0: Tensor[(1, 64, 54, 54), float32], Primitive=1) -> Tensor[(1, 64, 54, 54), float32] {
    add(%p0, %p0) /* ty=Tensor[(1, 64, 54, 54), float32] */
  };
  %6(%5) /* ty=Tensor[(1, 64, 54, 54), float32] */
}
使用 Sequential 应用一系列Pass
像上面这样应用pass实际上很麻烦,它可能需要用户更好地理解它们之间的依赖关系。 例如,目前 fusion 在 let bindings上效果不佳。 因此,如果在融合之前应用 relay.transform.ToANormalForm() ,我们将无法融合可融合的运算符,因为此Pass为每个表达式生成 let bindings以规范 Relay 程序。
因此,Relay 提供了 tvm.transform.Sequential,通过指定每个Pass所需的passes并将它们打包为一个整体来执行,从而减轻开发人员明确处理这些问题的负担。 例如,现在可以使用sequential 样式应用相同的passes,如下所示。 tvm.transform.Sequential 类似于 torch.nn.sequential 和 mxnet.gluon.block。 例如,torch.nn.sequential 用于包含将被添加以构建网络的一系列 PyTorch Module,它侧重于网络层。 相反,我们的Pass Infra中的 tvm.transform.Sequential 用于优化Pass。
# Now let's execute some passes through :py:class:`tvm.transform.Sequential`
f = example()
mod = tvm.IRModule.from_expr(f)
# Glob the interested passes.
seq = tvm.transform.Sequential(
    [
        relay.transform.FoldConstant(),
        relay.transform.EliminateCommonSubexpr(),
        relay.transform.FuseOps(fuse_opt_level=2),
    ]
)
mod1 = seq(mod)
print(mod1)
输出:
def @main(%x: Tensor[(1, 64, 56, 56), float32], %weight: Tensor[(64, 64, 3, 3), float32]) -> Tensor[(1, 64, 54, 54), float32] {
  %4 = fn (%p0: Tensor[(1, 64, 56, 56), float32], %p1: Tensor[(64, 64, 3, 3), float32], %p2: Tensor[(1, 64, 54, 54), float32], %p3: Tensor[(1, 64, 54, 54), float32], Primitive=1) -> Tensor[(1, 64, 54, 54), float32] {
    %0 = nn.conv2d(%p0, %p1, padding=[0, 0, 0, 0]) /* ty=Tensor[(1, 64, 54, 54), float32] */;
    %1 = add(%0, %p2) /* ty=Tensor[(1, 64, 54, 54), float32] */;
    %2 = add(%1, %p3) /* ty=Tensor[(1, 64, 54, 54), float32] */;
    %3 = add(%1, %p3) /* ty=Tensor[(1, 64, 54, 54), float32] */;
    add(%2, %3) /* ty=Tensor[(1, 64, 54, 54), float32] */
  };
  %4(%x, %weight, meta[relay.Constant][0] /* ty=Tensor[(1, 64, 54, 54), float32] */, meta[relay.Constant][1] /* ty=Tensor[(1, 64, 54, 54), float32] */) /* ty=Tensor[(1, 64, 54, 54), float32] */
}
从转换后的Relay程序中,我们可以看到仍然有两个相同的加法操作。这是因为实际上并没有执行EliminateCommonSubexpr这个Pass。原因别小于或者等于2的pass才会在tvm.transform.Sequential下默认执行。但是,Pass Infra 提供了一个配置接口,供用户自定义他们想要执行的优化级别。
with tvm.transform.PassContext(opt_level=3):
    mod2 = seq(mod)
print(mod2)
def @main(%x: Tensor[(1, 64, 56, 56), float32], %weight: Tensor[(64, 64, 3, 3), float32]) -> Tensor[(1, 64, 54, 54), float32] {
  %3 = fn (%p0: Tensor[(1, 64, 56, 56), float32], %p1: Tensor[(64, 64, 3, 3), float32], %p2: Tensor[(1, 64, 54, 54), float32], %p3: Tensor[(1, 64, 54, 54), float32], Primitive=1) -> Tensor[(1, 64, 54, 54), float32] {
    %0 = nn.conv2d(%p0, %p1, padding=[0, 0, 0, 0]) /* ty=Tensor[(1, 64, 54, 54), float32] */;
    %1 = add(%0, %p2) /* ty=Tensor[(1, 64, 54, 54), float32] */;
    %2 = add(%1, %p3) /* ty=Tensor[(1, 64, 54, 54), float32] */;
    add(%2, %2) /* ty=Tensor[(1, 64, 54, 54), float32] */
  };
  %3(%x, %weight, meta[relay.Constant][0] /* ty=Tensor[(1, 64, 54, 54), float32] */, meta[relay.Constant][1] /* ty=Tensor[(1, 64, 54, 54), float32] */) /* ty=Tensor[(1, 64, 54, 54), float32] */
}
我们现在可以看到Relay程序中只保留了两个相同表达式的一个。此外,用户还可以使用disabled_pass配置来选择性地禁用某些Pass,这类似于使用通用编译器(比如GCC和Clang)的-fno-xxx选项。例如,我们可以如下面的例子所示禁用EliminateCommonSubexpr Pass,打印的Relay Module将再次显示两个相同的加法操作。
with tvm.transform.PassContext(opt_level=3, disabled_pass=["EliminateCommonSubexpr"]):
    mod3 = seq(mod)
print(mod3)
def @main(%x: Tensor[(1, 64, 56, 56), float32], %weight: Tensor[(64, 64, 3, 3), float32]) -> Tensor[(1, 64, 54, 54), float32] {
  %4 = fn (%p0: Tensor[(1, 64, 56, 56), float32], %p1: Tensor[(64, 64, 3, 3), float32], %p2: Tensor[(1, 64, 54, 54), float32], %p3: Tensor[(1, 64, 54, 54), float32], Primitive=1) -> Tensor[(1, 64, 54, 54), float32] {
    %0 = nn.conv2d(%p0, %p1, padding=[0, 0, 0, 0]) /* ty=Tensor[(1, 64, 54, 54), float32] */;
    %1 = add(%0, %p2) /* ty=Tensor[(1, 64, 54, 54), float32] */;
    %2 = add(%1, %p3) /* ty=Tensor[(1, 64, 54, 54), float32] */;
    %3 = add(%1, %p3) /* ty=Tensor[(1, 64, 54, 54), float32] */;
    add(%2, %3) /* ty=Tensor[(1, 64, 54, 54), float32] */
  };
  %4(%x, %weight, meta[relay.Constant][0] /* ty=Tensor[(1, 64, 54, 54), float32] */, meta[relay.Constant][1] /* ty=Tensor[(1, 64, 54, 54), float32] */) /* ty=Tensor[(1, 64, 54, 54), float32] */
}
到目前为止应用的Pass与目标设备无关。 Pass Infra 还提供了一些硬件感知Pass。 例如,layout alteration pass就属于此类。
with tvm.transform.PassContext(opt_level=3):
    mod4 = seq(mod)
print(mod4)

seq1 = tvm.transform.Sequential([relay.transform.AlterOpLayout()])
with tvm.transform.PassContext(opt_level=3):
    with tvm.target.Target("llvm"):
        mod5 = seq1(mod)
print(mod5)
Relay Module输出结果:
def @main(%x: Tensor[(1, 64, 56, 56), float32], %weight: Tensor[(64, 64, 3, 3), float32]) -> Tensor[(1, 64, 54, 54), float32] {
  %3 = fn (%p0: Tensor[(1, 64, 56, 56), float32], %p1: Tensor[(64, 64, 3, 3), float32], %p2: Tensor[(1, 64, 54, 54), float32], %p3: Tensor[(1, 64, 54, 54), float32], Primitive=1) -> Tensor[(1, 64, 54, 54), float32] {
    %0 = nn.conv2d(%p0, %p1, padding=[0, 0, 0, 0]) /* ty=Tensor[(1, 64, 54, 54), float32] */;
    %1 = add(%0, %p2) /* ty=Tensor[(1, 64, 54, 54), float32] */;
    %2 = add(%1, %p3) /* ty=Tensor[(1, 64, 54, 54), float32] */;
    add(%2, %2) /* ty=Tensor[(1, 64, 54, 54), float32] */
  };
  %3(%x, %weight, meta[relay.Constant][0] /* ty=Tensor[(1, 64, 54, 54), float32] */, meta[relay.Constant][1] /* ty=Tensor[(1, 64, 54, 54), float32] */) /* ty=Tensor[(1, 64, 54, 54), float32] */
}


def @main(%x: Tensor[(1, 64, 56, 56), float32], %weight: Tensor[(64, 64, 3, 3), float32]) -> Tensor[(1, 64, 54, 54), float32] {
  %0 = layout_transform(%x, src_layout="NCHW", dst_layout="NCHW16c") /* ty=Tensor[(1, 4, 56, 56, 16), float32] */;
  %1 = add(meta[relay.Constant][0] /* ty=Tensor[(1, 64, 54, 54), float32] */, meta[relay.Constant][0] /* ty=Tensor[(1, 64, 54, 54), float32] */ /* ty=Tensor[(1, 64, 54, 54), float32] */) /* ty=Tensor[(1, 64, 54, 54), float32] */;
  %2 = multiply(%1, 2f /* ty=float32 */) /* ty=Tensor[(1, 64, 54, 54), float32] */;
  %3 = nn.conv2d(%0, %weight, padding=[0, 0, 0, 0], data_layout="NCHW16c") /* ty=Tensor[(1, 4, 54, 54, 16), float32] */;
  %4 = layout_transform(%2, src_layout="NCHW", dst_layout="NCHW16c") /* ty=Tensor[(1, 4, 54, 54, 16), float32] */;
  %5 = add(%3, %4) /* ty=Tensor[(1, 4, 54, 54, 16), float32] */;
  %6 = layout_transform(meta[relay.Constant][0] /* ty=Tensor[(1, 64, 54, 54), float32] */ /* ty=Tensor[(1, 64, 54, 54), float32] */ /* ty=Tensor[(1, 64, 54, 54), float32] */, src_layout="NCHW", dst_layout="NCHW16c") /* ty=Tensor[(1, 4, 54, 54, 16), float32] */;
  %7 = add(%5, %6) /* ty=Tensor[(1, 4, 54, 54, 16), float32] */;
  %8 = add(%5, %6) /* ty=Tensor[(1, 4, 54, 54, 16), float32] */;
  %9 = add(%7, %8) /* ty=Tensor[(1, 4, 54, 54, 16), float32] */;
  layout_transform(%9, src_layout="NCHW16c", dst_layout="NCHW") /* ty=Tensor[(1, 64, 54, 54), float32] */
}
使用Python装饰器实现一个Pass
这个示例说明了我们如何使用Python装饰器通过pass infra编排定制的优化pass。此功能极大的简化了实现passes的难度。例如,用户可以简单的定义一个装饰器类来实现函数级别的优化。如下面的例子所示,transform_function包装了一个类,将所有的常量乘以c。然后,当我们调用这个自定义Pass之后,给定Module中的每一个函数都会被访问并且函数中的每个常量都会被替换。
@relay.transform.function_pass(opt_level=1)
class CustomPipeline:
    """Simple test function to replace one argument to another."""

    def __init__(self, multiplier):
        self.multiplier = multiplier

    # This function can define a pass.
    def transform_function(self, func, mod, ctx):
        obj = self

        class ReplaceConstant(tvm.relay.ExprMutator):
            def visit_constant(self, c):
                return relay.multiply(obj.multiplier, c)

        return ReplaceConstant().visit(func)


f = example()
mod = tvm.IRModule.from_expr(f)
custom_pass = CustomPipeline(multiplier=relay.const(3, "float32"))
assert custom_pass.info.name == "CustomPipeline"
mod3 = custom_pass(mod)
print(mod3)
输出:
def @main(%x: Tensor[(1, 64, 56, 56), float32], %weight: Tensor[(64, 64, 3, 3), float32]) -> Tensor[(1, 64, 54, 54), float32] {
  %0 = multiply(3f /* ty=float32 */, meta[relay.Constant][0] /* ty=Tensor[(1, 64, 54, 54), float32] */) /* ty=Tensor[(1, 64, 54, 54), float32] */;
  %1 = add(%0, %0) /* ty=Tensor[(1, 64, 54, 54), float32] */;
  %2 = multiply(3f /* ty=float32 */ /* ty=float32 */, 2f /* ty=float32 */) /* ty=float32 */;
  %3 = nn.conv2d(%x, %weight, padding=[0, 0, 0, 0]) /* ty=Tensor[(1, 64, 54, 54), float32] */;
  %4 = multiply(%1, %2) /* ty=Tensor[(1, 64, 54, 54), float32] */;
  %5 = add(%3, %4) /* ty=Tensor[(1, 64, 54, 54), float32] */;
  %6 = add(%5, %0) /* ty=Tensor[(1, 64, 54, 54), float32] */;
  %7 = add(%5, %0) /* ty=Tensor[(1, 64, 54, 54), float32] */;
  add(%6, %7) /* ty=Tensor[(1, 64, 54, 54), float32] */
}
调试一个Pass
TVM 为用户提供即插即用风格的调试pass,通过特殊pass(PrintIR)完成特定pass后打印 IR 以转储整个模块的 IR。 如下所示:
f = example()
mod = tvm.IRModule.from_expr(f)
seq = tvm.transform.Sequential(
    [
        relay.transform.FoldConstant(),
        tvm.transform.PrintIR(),
        relay.transform.EliminateCommonSubexpr(),
        relay.transform.FuseOps(),
        relay.transform.AlterOpLayout(),
    ]
)

# By inserting the ``PrintIR`` pass after ``FoldConstant``, the pass infra will
# dump out the module IR when ``FoldConstant`` is done. Users can plug in this
# pass after any pass they want to debug for viewing the optimization effect.
#
# There is a more flexible debugging mechanism also exposed by the build configuration
# object. One can pass a tracing function which can be used to execute arbitrary code
# before and/or after each pass. A tracing function will receive a :py::class:`tvm.IRModule`,
# a :py:class:`tvm.transform.PassInfo` object,
# and a boolean indicating whether you are executing before, or after a pass.
# An example is below.


@tvm.instrument.pass_instrument
class PrintIR:
    """Print the name of the pass, the IR, only before passes execute."""

    def run_before_pass(self, mod, info):
        print("Running pass: {}", info)
        print(mod)


with tvm.transform.PassContext(opt_level=3, instruments=[PrintIR()]):
    with tvm.target.Target("llvm"):
        # Perform the optimizations.
        mod = seq(mod)
print(mod)

print("done")
这里由于对sequential pass中每个Pass后都插入了这个PrintIR Pass,输出结果会很长,这里就不贴了,感兴趣的同学可以自己跑一下程序:tvm/tutorials/dev/use_pass_infra.py
0x02. 支配树
在讲解算符融合的代码前需要先明确一个叫支配树的东西,不然程序是不好理解的,大家可以参考这篇博客进行理解:https://www.cnblogs.com/ZeonfaiHo/p/6594642.html,但是TVM算符融合Pass里面用到只是支配树里面比较初级的东西,所以我们在这里借用这篇博客的一些解释说明一下就好。
什么是支配树?
对于一张有向图(可以有环)我们规定一个起点r, 从r点到图上另一个点w可能存在很多条路径(下面将r到w简写为r→w)。
如果对于r→w的任意一条路径中都存在一个点p, 那么我们称点p为w的支配点(也可以称作是r→w的必经点), 注意r点不讨论支配点. 下面用idom[u]表示离点u最近的支配点。
对于原图上除r外每一个点u, 从idom[u]向u建一条边, 最后我们可以得到一个以r为根的树. 这个树我们就叫它"支配树"。
简化问题
1.树
对于一棵树, 我们用r表示根节点, u表示树上的某个非根节点. 很容易发现从r→u路径上的所有点都是支配点, 而idom[u]就是u的父节点。
这个可以在O(n)的时间内实现。
2.DAG(有向无环图)
因为是有向无环图, 所以我们可以按照拓扑序构建支配树。
假设当前我们构造到拓扑序中第x个节点编号为u, 那么拓扑序中第1 ~ X−1个节点已经处理好了, 考虑所有能够直接到达点u的节点, 对于这些节点我们求出它们在支配树上的最近公共祖先v, 这个点v就是点u在支配树上的父亲
如果使用倍增求LCA,这个问题可以在O((n+m)logn)的时间内实现。
对于这两个问题我们能够很简便的求出支配树。
我们知道TVM Relay表示的计算图是一个DAG,所以我们其实了解到这里就够了,不需要继续深入了。

但在算符融合的Pass中构建的其实是后支配树,这里不是通过拓扑序来处理,而是通过DFS序来进行处理。
为什么要这样做呢?我们可以看一下fuse_ops.cc中举的例子:
            conv2d
            /  |  \
           /   |   \
         op    op   op
          \    |    /
           \   |   /
          elemwise add
               |
可以看到conv2d要和elemwise add发生融合,则必须判断三个op是否能和elemwise add融合。
0x03. TVM的算符融合(操作符融合)
在TVM论文中提到,对于GPU和特定加速器而言,将多次操作融合在一起的优化方法能较为明显地降低执行时间。操作符融合的想法是来源于单个Kernel函数会节省将中间结果写回全局内存的时间消耗。从具体分析来看,我们总结了四种类别的图操作符:
- injective(one-to-one map):映射函数,比如加法,点乘等。
- reduction:约简,如sum/max/min,输入到输出具有降维性质的,比如sum。
- complex-out-fusable(can fuse element-wise map to output),是计算比较复杂的,如conv2d
- opaque(cannot be fused) 无法被融合的算符,比如sort。
根据以上对算符的不同类型,TVM提供了三种融合规则:
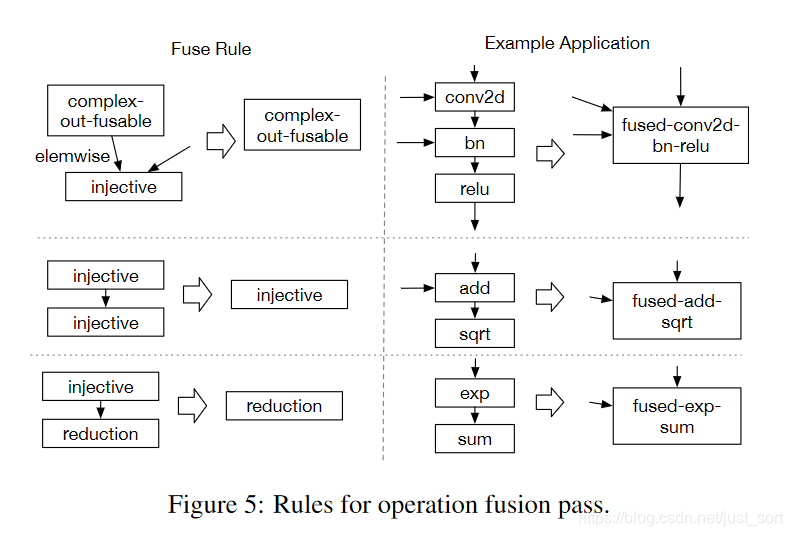
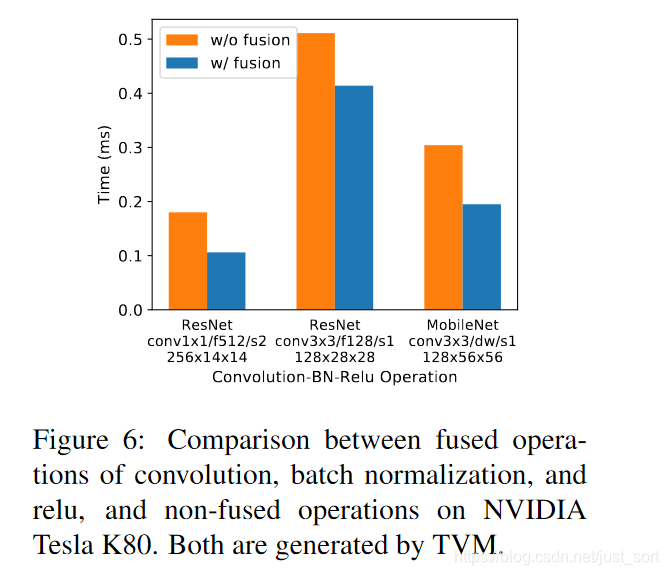
下图还展示了conv-bn-relu融合前后的性能对比:
在TVM中实现算符融合 Pass的代码在tvm/src/relay/transforms/fuse_ops.cc。TVM的算符融合主要包含以下三个步骤:
- 遍历Relay树,建立DAG用于后支配树分析
- 建立后支配树
- 应用算符融合算法
建立DAG
首先我们看一下Pass的注册接口:
namespace transform {

Pass FuseOps(int fuse_opt_level) {
  runtime::TypedPackedFunc<Function(Function, IRModule, PassContext)> pass_func =
      [=](Function f, IRModule m, PassContext pc) {
        int opt_level = fuse_opt_level == -1 ? pc->opt_level : fuse_opt_level;
        auto max_fuse_depth = pc->GetConfig("relay.FuseOps.max_depth", Integer(kMaxFusedOps));
        return Downcast<Function>(FuseOps(f, opt_level, max_fuse_depth.value(), m));
      };
  return CreateFunctionPass(pass_func, 1, "FuseOps", {"InferType"});
}

TVM_REGISTER_GLOBAL("relay._transform.FuseOps").set_body_typed(FuseOps);
可以看到FuseOps这个Pass依赖了InferType这个Pass,并且这里通过PassContext获取了一些必要的配置信息,最后还为这个Pass注册了Python接口。
下面我们来看一下DAG的创建流程,首先定位到:
IndexedForwardGraph IndexedForwardGraph::Create(support::Arena* arena, const Expr& body) {
  return Creator(arena).Prepare(body);
}
其中Creator这个类是核心:
// Creator of post dominator tree of the dataflow
class IndexedForwardGraph::Creator : private ExprVisitor {
 public:
  explicit Creator(support::Arena* arena) : arena_(arena) {}

  IndexedForwardGraph Prepare(const Expr& body) {
    this->Update(body, nullptr, kOpaque);
    this->VisitExpr(body);
    return std::move(graph_);
  }
  //这里省略了成员变量和函数
  .....
}
通过之前对Pass Infra的介绍,我们知道VisitExpr实际调用的是在类IndexedforwardGraph中定义的VisitExpr_函数,通过深度优先搜索遍历Relay树,并且建立DAG图。上面的函数中,在调用VisitExpr之前调用Update函数来对DAG进行了初始化并插入根节点。
DFS可以获得一个后序搜索树,在搜索的过程中使用Update这个成员函数来建边,我们来看一下这个函数接口:
// Update the message stored at the node.
  void Update(const Expr& node, IndexedForwardGraph::Node* parent, OpPatternKind pattern) {
    const tvm::Object* key = node.get();
    IndexedForwardGraph::Node* current;
    auto it = graph_.node_map.find(key);
    if (it != graph_.node_map.end()) {
      current = it->second;
    } else {
      current = arena_->make<IndexedForwardGraph::Node>();
      graph_.node_map[key] = current;
    }
    if (parent != nullptr) {
      auto* link = arena_->make<LinkNode<IndexedForwardGraph::Edge> >();
      link->value.node = parent;
      link->value.pattern = pattern;
      current->outputs.Push(link);
    } else {
      current->extern_ref = true;
    }
  }
首先输入参数中有一个OpPatternKind pattern,这个数据类型定义在tvm/include/tvm/relay/op_attr_types.h中,它可以指定节点和边(边也是一种节点)的Operator类型。然后在上面的函数中可以看到节点有一个outputs成员变量,它保存了一个节点的输入的边,在构建后序支配树会通过这些输入边求取LCA。那么在这个搜索树(DAG)基础上应用支配树算法,就能够得到一个后序支配树了。
/*! \brief operator pattern used in graph fusion */
enum OpPatternKind {
  // Elementwise operation
  kElemWise = 0,
  // Broadcasting operator, can always map output axis to the input in order.
  // for example :code:`out[i, ax1, j, ax2] = input[i, j]`.
  // Note that the axis need to be in order so transpose is not a bcast operator.
  kBroadcast = 1,
  // Injective operator, can always injectively map output axis to a single input axis.
  // All injective operator can still be safely fused to injective and reduction.
  kInjective = 2,
  // Communicative reduction operator.
  kCommReduce = 3,
  // Complex operation, can still fuse elemwise operations into its output.
  // but cannot chain another complex op
  kOutEWiseFusable = 4,
  // The pattern for tuple nodes. Can fuse into subsequent injective ops,
  // but treated specially
  kTuple = 7,
  // Opaque operation, cannot fuse anything.
  kOpaque = 8
};
在IndexedForwardGraph::Creator这个类中为不同节点类型重写visitExpr_函数,节点类型有FunctionNode,ConstantNode, CallNode, TuppleNode等。比如CallNode的visitExpr_函数实现如下:
void VisitExpr_(const CallNode* call) final {
    ICHECK(graph_.node_map.count(call));
    Node* node = graph_.node_map.at(call);
    static auto fpattern = Op::GetAttrMap<TOpPattern>("TOpPattern");
    // Now we set the pattern of this call.
    //
    // If we see a call mentioning an operator we should mark it with its
    // annotated pattern.
    //
    // If the pattern is not annotated we will default to opaque.
    //
    // Finally if the operator position is not a call node we will
    // need to call Update, as it may be an arbitrary expression.
    OpPatternKind op_pattern = kOpaque;
    if (const OpNode* opnode = call->op.as<OpNode>()) {
      auto op = GetRef<Op>(opnode);
      if (IsDynamic(call->checked_type()) && IsDataDependent(call)) {
        // output of a shape func can't be fed to a data-dependent shape func
        op_pattern = kOpaque;
      } else {
        op_pattern = static_cast<OpPatternKind>(fpattern[op]);
      }
    } else {
      this->Update(call->op, node, kOpaque);
    }

    node->pattern = op_pattern;
    this->Update(call->op, nullptr, kOpaque);
    const auto* rtype = call->checked_type().as<TensorTypeNode>();
    // pass the analysis back to all the children it references.
    for (size_t i = 0; i < call->args.size(); ++i) {
      const auto* arg_type = call->args[i]->checked_type().as<TensorTypeNode>();
      // specifically check if result type is the same as arguments type
      OpPatternKind edge_pattern = op_pattern;
      if (edge_pattern == kBroadcast && arg_type != nullptr && rtype != nullptr &&
          attr_equal_(rtype->shape, arg_type->shape)) {
        edge_pattern = kElemWise;
      }
      this->Update(call->args[i], node, edge_pattern);
    }
    ExprVisitor::VisitExpr_(call);
    this->AddNode(call);
  }
我们可以看到函数的最后还递归调用了VisitExpr_函数,将深度优先搜索到的节点按照叶节点为起点顺序一次加入DAG图中,因为这是后序遍历。只有ConstantNode的VisitExpr_函数不会再递归调用,因为常量节点是不会存在叶节点的。
在CallNode的VisitExpr_的实现中,首先会将其输入加入到DAG中,同时遍历输入和输入有关的Edge(边也是特殊的节点),并更新DAG。我们知道在基类ExprVisitor中对CallNode访问函数定义为:
void ExprVisitor::VisitExpr_(const CallNode* op) {
  this->VisitSpan(op->span);
  this->VisitExpr(op->op);

  for (auto ty_arg : op->type_args) {
    this->VisitType(ty_arg);
  }

  for (auto arg : op->args) {
    this->VisitExpr(arg);
  }
}
并且这里IndexForwardGraph类继承了ExprVisitor类,而VisitExpr_是虚函数,this就会指向IndexForwardGraph实例,最终就会调用这个类中定义的VisitExpr_函数,实现递归的遍历relay树。
建立后序支配树
上面我们已经完成了利用Relay树建立了用于后支配树构建的DAG(注意这个DAG是DFS后序遍历产生的)。接下来我们就来看看如何建立后序支配树,支配树的构建由DominatorTree这个类的PostDom成员函数来完成。因为在后序遍历Relay树的时候最后一个节点就是后序支配树的根节点,所以我们从根节点开始寻找每个节点相连节点的LCA,那么这个LCA就是后序支配点。代码实现如下:
DominatorTree DominatorTree::PostDom(support::Arena* arena, const IndexedForwardGraph& graph) {
  DominatorTree tree;
  tree.nodes.resize(graph.post_dfs_order.size(), nullptr);
  // reverse topo order
  for (size_t i = graph.post_dfs_order.size(); i != 0; --i) {
    size_t index = i - 1;
    tree.nodes[index] = tree.GetNode(arena, graph.post_dfs_order[index]);
  }
  return tree;
}
其中GetNode函数用来获取支配点,构造后支配树。代码实现如下:
/*!
   * \brief Convert the Node from an IndexedForwardGraph Node into DomaintorTree Node.
   * \param arena The Arena.
   * \param gnode An IndexedForwardGraph Node.
   * \return The DominatorTree Node.
   */
  Node* GetNode(support::Arena* arena, IndexedForwardGraph::Node* gnode) {
    Node* tnode = arena->make<Node>();
    tnode->gnode = gnode;
    if (gnode->extern_ref) {
      tnode->depth = 1;
      tnode->parent = nullptr;
      tnode->pattern = kOpaque;
    } else {
      // find the LCAs of all outputs.
      OpPatternKind pattern = kElemWise;
      Node* parent = LeastCommonAncestor(gnode->outputs, &pattern);
      tnode->depth = parent ? parent->depth + 1 : 1;
      tnode->parent = parent;
      tnode->pattern = pattern;
    }
    return tnode;
  }
可以看到这个函数会先初始化后支配树根节点,然后求每个节点的输入节点的LCA,也就是这个节点的支配点。这个函数中的LeastCommonAncestor用来求取当前节点所有输入节点(和这个节点相连的所有边)的LCA,代码是实现如下:
/*!
   * \brief Find the least common ancestor of a list of nodes.
   * \param nodes the nodes.
   * \param edge_pattern
   *        The combined edge pattern across all the parents.
   * \return The least common ancestor of all nodes.
   */
  Node* LeastCommonAncestor(const LinkedList<IndexedForwardGraph::Edge>& input_nodes,
                            OpPatternKind* edge_pattern) {
    auto link = input_nodes.head;
    if (link == nullptr) {
      return nullptr;
    }
    auto get_node = [&](const IndexedForwardGraph::Edge& edge) {
      size_t oindex = edge.node->index;
      ICHECK_LT(oindex, nodes.size());
      Node* onode = nodes[oindex];
      ICHECK(onode != nullptr);
      return onode;
    };
    Node* parent = get_node(link->value);
    *edge_pattern = CombinePattern(*edge_pattern, link->value.pattern);
    link = link->next;
    for (; link != nullptr; link = link->next) {
      parent = LeastCommonAncestor(parent, get_node(link->value), edge_pattern);
      *edge_pattern = CombinePattern(*edge_pattern, link->value.pattern);
    }
    return parent;
  }
这个函数实际上是一个for循环,固定第一个节点然后求第二个节点和第一个节点的LCA,求出来之后更新当前的parent为这个LCA节点,以此类推遍历完所有节点后就获取了所有节点的LCA。在DAG中求取LCA的具体代码实现为:
/*!
   * \brief Find the least common ancestor of the two nodes.
   * \param lhs The left node.
   * \param rhs The right node.
   * \param edge_pattern
   *        The combined edge pattern across all the parents.
   * \return The least common ancestor of the two.
   */
  static Node* LeastCommonAncestor(Node* lhs, Node* rhs, OpPatternKind* edge_pattern) {
    while (lhs != rhs) {
      if (lhs == nullptr) return nullptr;
      if (rhs == nullptr) return nullptr;
      if (lhs->depth < rhs->depth) {
        edge_pattern[0] = CombinePattern(edge_pattern[0], rhs->pattern);
        rhs = rhs->parent;
      } else if (rhs->depth < lhs->depth) {
        edge_pattern[0] = CombinePattern(edge_pattern[0], lhs->pattern);
        lhs = lhs->parent;
      } else {
        edge_pattern[0] = CombinePattern(edge_pattern[0], lhs->pattern);
        edge_pattern[0] = CombinePattern(edge_pattern[0], rhs->pattern);
        lhs = lhs->parent;
        rhs = rhs->parent;
      }
    }
    return lhs;
  }
这个函数就是求取LCA最暴力的做法,当两个节点的深度不一致的时候就沿着父亲节点向上爬,知道深度一致就找打了两个节点的LCA节点。在计算支配点的pattern的时候,会依据pattern的定义,选择pattern值最大的作为LCA的pattern。这是猜测因为定义的从最小值到最大值pattern可以向下进行融合,比如kElemWise=0, kInjective=2, 那么前者就能融合到KInjective中。
融合
接下来介绍算符融合的最后一个阶段,融合。我们在完成DAG和后支配树postDominator Tree的构建知道就可以进行算符融合了。对于融合,fuse_ops.cc中的概述如下:
The fusion algorithm traverses from each node and checks if it can be fused to its immediate post dominator. It has to check the following things:
- CheckPath: check all the path between a node and its immediate post-dominator satisfies the fuse condition.
- Note that these intermediate node can already be fused with another nodes, the algorithm will still run correctly.
- CommitFuse: mark all the nodes between source and post-dominator as the same group.
- We use an Union-Find data structure to manage the groups.
首先融合操作的接口在这个函数中:
std::vector<GraphPartitioner::Group*> GraphPartitioner::Partition(
    const IndexedForwardGraph& graph) {
  this->InitGroups(graph);
  if (opt_level_ == 0) return std::move(groups_);
  // get post dominator tree
  auto post_dom_tree = DominatorTree::PostDom(arena_, graph);
  // run fusion algorithm.
  for (int phase = 0; phase < 3; ++phase) {
    this->RunFuse(graph, post_dom_tree, phase);
  }
  return std::move(groups_);
}
这里在获取了IndexedForwardGraph和DominatorTree之后,使用了三个phase完成了算符融合,接下来我们就跟进一下phase 0这个过程。在这个之前有一个this->InitGroups函数,它实现了初始化groups_的功能,其中groups_是GraphPartitioner类中定义的结构体变量,用于表示融合后的图结构,如果某些算符可以融合,那么就通过这个结构体的parent,master_ref将这些节点建立连接关系。Group首先进行初始化和DAG相同的图,即这里的InitGroups函数。然后分别遍历DAG,postDominator tree,以及group图中节点,来判断算子是否能被融合。Group结构体的定义和InitGroups的代码实现如下:
struct Group {
    /*! \brief The parent in the union find data structure. */
    Group* parent{nullptr};
    /*! \brief The pattern of the group */
    OpPatternKind pattern;
    /*! \brief reference to the root node. */
    const tvm::Object* root_ref{nullptr};
    /*!
     * \brief Reference to the anchor node,
     * this field is not nullptr only if pattern is kOutEWiseFusable.
     */
    const tvm::Object* anchor_ref{nullptr};
    /*!
     * \brief Find the group root, perform path compression
     * \return The root type node.
     */
    Group* FindRoot() {
      // fast path
      if (this->parent == nullptr) return this;
      // slow path with path compression.
      Group* root = this;
      while (root->parent != nullptr) {
        root = root->parent;
      }
      for (Group* p = this; p != root;) {
        Group* parent = p->parent;
        p->parent = root;
        p = parent;
      }
      return root;
    }

    /*!
     * \brief The number of nodes belonging to this group
     */
    uint32_t num_nodes{1};
  };

// Initialize the groups.
  void InitGroups(const IndexedForwardGraph& graph) {
    groups_.resize(graph.post_dfs_order.size());
    for (size_t nid = 0; nid < groups_.size(); ++nid) {
      const auto* graph_node = graph.post_dfs_order[nid];
      auto* group_node = arena_->make<Group>();
      group_node->pattern = graph_node->pattern;
      group_node->root_ref = graph_node->ref;
      // set anchor ref if necessary.
      if (group_node->pattern == kOutEWiseFusable) {
        group_node->anchor_ref = graph_node->ref;
      }
      groups_[nid] = group_node;
    }
  }
继续看一下算符融合的核心函数RunFuse,
// execute the fusion algorithm.
  void RunFuse(const IndexedForwardGraph& graph, const DominatorTree& post_dom_tree, int phase) {
    // 从计算图的顶部开始遍历,在初始状态groups_的节点等同于IndexedForwardGraph的节点。
    for (size_t nid = 0; nid < groups_.size(); ++nid) {
      // the group of current node has been specified already.
      auto* graph_node = graph.post_dfs_order[nid];
      auto* dom_node = post_dom_tree.nodes[nid];
      Group* group_node = groups_[nid];
      ICHECK(group_node != nullptr);
      // no actions for opaque nodes
      if (group_node->pattern == kOpaque) continue;
      // no actions needed if the current node have no dominator
      if (dom_node->parent == nullptr) continue;
      ICHECK(!graph_node->extern_ref);
      size_t dom_parent_gindex = dom_node->parent->gnode->index;

      //  能够融合的节点超过了一定数量(max_fuse_depth_)就不融合
      if (CountFusedNodesWithNewChild(graph_node, dom_node->parent->gnode) > max_fuse_depth_)
        continue;

      if (phase == 2) {
        // Fuse injective ops into intermediate tuples, if any
        if (group_node->pattern > kInjective) continue;
        Group* dom_parent_group = groups_[dom_parent_gindex];
        Group* dom_root_group = dom_parent_group->FindRoot();
        // If dom node group has a tuple as its root, we do not fuse tuple fields into it
        if (dom_root_group->pattern == kTuple) continue;
        if (dom_parent_group->pattern == kTuple && dom_root_group->pattern <= kInjective) {
          // Now we know the tuple has been fused into subsequent injective ops
          auto fcond = [](OpPatternKind kind, bool is_sink) { return kind <= kInjective; };
          // dom_root_group can also be tuple, as in inception layers
          // CheckPath is needed to avoid fusing two intermediate tuples
          if (CheckPath(graph_node, dom_node->parent->gnode, fcond)) {
            CommitFuse(graph_node, dom_node->parent->gnode);
          }
        }
        continue;
      }

      // 如果当前节点和父节点已经融合了就跳过当前节点,避免重复融合
      if (groups_[dom_parent_gindex] != nullptr &&
          group_node->FindRoot() == groups_[dom_parent_gindex]->FindRoot()) {
        continue;
      }
      // Do not fuse into tuple for now
      if (groups_[dom_parent_gindex]->pattern == kTuple) continue;
      // Try to fuse current node to its post-dominator.
      if (group_node->pattern == kOutEWiseFusable) {
        if (phase != 0) continue;
        // Path for OutEWiseFusable: conv2d
        // Check if the dominator relation is elemwise.
        if (dom_node->parent != nullptr && dom_node->pattern == kElemWise) {
          ICHECK(dom_node->parent->gnode != nullptr);
          // The fuse can be executed if all the intermediate ops are still broadcast.
          auto fcond = [](OpPatternKind kind, bool is_sink) { return kind <= kBroadcast; };
          if (CheckPath(graph_node, dom_node->parent->gnode, fcond)) {
            CommitFuse(graph_node, dom_node->parent->gnode);
          }
        }
      } else if (group_node->pattern <= kBroadcast) {
        // Pre-condition: can only be fused to parent which is injective or reduction.
        if (dom_node->parent != nullptr &&
            (dom_node->pattern <= kInjective || dom_node->pattern == kCommReduce)) {
          // Check if all the intermediate ops are still broadcast.
          // The final terminal node can already be fused to a OutEWiseFusable group.
          auto fcond = [](OpPatternKind kind, bool is_sink) {
            if (!is_sink) {
              // Elemwise, broadcast, and injective ops on the parallel branches
              // are allowed be fused to the elemwise/broadcast anchor.
              return kind <= kInjective;
            } else {
              return (kind <= kBroadcast || kind == kCommReduce || kind == kInjective ||
                      kind == kOutEWiseFusable);
            }
          };
          if (CheckPath(graph_node, dom_node->parent->gnode, fcond)) {
            CommitFuse(graph_node, dom_node->parent->gnode);
          }
        }
      } else if (group_node->pattern == kInjective || group_node->pattern == kTuple) {
        // defer injective fusion to second phase.
        // so conv2d always finishes fusing.
        if (phase != 1) continue;
        // Check if all path are injective.
        auto fcond = [](OpPatternKind kind, bool is_sink) { return kind <= kInjective; };
        if (CheckPath(graph_node, dom_node->parent->gnode, fcond)) {
          CommitFuse(graph_node, dom_node->parent->gnode);
        }
      } else {
        // do nothing.
        ICHECK(group_node->pattern == kCommReduce);
      }
    }
  }
};
不难发现当phase=0时只处理了kElemWise,kBroadcast融合,从之前介绍的Op融合优先级关系来看ElemWise/Broadcast可以和ElemWise/Broadcast/Injective/CommReduce尝试进行融合。
然后我们看一下另外两个处理的核心函数即CheckPath和CommitFuse,CheckPath就是考察src到sink 节点之间的路径是否可以进行融合,判断条件使用了一个正则表达式,即上面的auto fcond = [](OpPatternKind kind, bool is_sink) ...。然后我们看一下CheckPath这个函数的代码实现:
/*!
   * \brief Check all the node and edge pattern
   *  between src and sink satisfies fcond.
   *
   * src is not checked.
   *
   * \param src The source node.
   * \param sink The termination node.
   * \param fcond The condition to be checked.
   * \tparam F the condition function, with signature
   * \note sink must be a post-dominator of src.
   */
  template <typename F>
  bool CheckPath(IndexedForwardGraph::Node* src, IndexedForwardGraph::Node* sink, F fcond) {
    ICHECK(!src->extern_ref);
    visited_.clear();
    ICHECK(src != sink);
    for (auto link = src->outputs.head; link != nullptr; link = link->next) {
      if (!CheckPath_(link->value.node, sink, fcond)) return false;
    }
    return true;
  }
在CheckPath这个函数中递归调用了名为CheckPath_的函数,这样就可以遍历当前节点到LCA节点的所有路径,然后通过fcond(gnode->pattern, src == sink)判断是否符合融合规则。
只有融合终节点支持kCommReduce和kOutEWiseFusable,而Path路径上的节点支持path路径中只支持ElemWise/Broadcast/Injective多种算符融合。
然后我们再看一下CommitFuse这个关键函数,当判断支配树的前后节点可以融合后,那么就开始执行融合操作,函数实现如下:
/*!
   * \brief Commit fusion operation.
   * \param src The source node.
   * \param sink The termination node.
   * \note sink must be a post-dominator of src.
   */
  void CommitFuse(IndexedForwardGraph::Node* src, IndexedForwardGraph::Node* sink) {
    Group* target = groups_[sink->index];
    visited_.clear();
    ICHECK(src != sink);
    CommitFuse_(src, sink, target);
  }
这里新增了一个Group* target指针,来指定融合的节点。然后调用CommitFuse_这个递归函数完成融合。
  // Internal implelementation of CommitFuse
  void CommitFuse_(IndexedForwardGraph::Node* src, IndexedForwardGraph::Node* sink, Group* target) {
    if (src == sink) return;
    if (visited_.count(src)) return;
    visited_.insert(src);
    Group* gnode = groups_[src->index];
    ICHECK(gnode != nullptr);
    // merge the current group to the parent if possible.
    MergeFromTo(gnode, target);
    for (auto link = src->outputs.head; link != nullptr; link = link->next) {
      CommitFuse_(link->value.node, sink, target);
    }
  }
这里的MergeFromTo(gnode, target);节点是融合的实现,代码如下:
/*!
   * \brief Merge the child group to the parent.
   * \param child The child group.
   * \param parent The parent group.
   */
  void MergeFromTo(Group* child, Group* parent) {
    child = child->FindRoot();
    parent = parent->FindRoot();
    if (child == parent) return;
    // update the number of nodes of the parent group
    parent->num_nodes += child->num_nodes;
    child->parent = parent;
    // update anchor ref and pattern
    if (child->anchor_ref != nullptr) {
      ICHECK(parent->anchor_ref == nullptr);
      parent->anchor_ref = child->anchor_ref;
      parent->pattern = CombinePattern(child->pattern, parent->pattern);
    }
  }
我们首先来看一下这个函数里面的child->FindRoot()函数,在上面介绍Group定义的时候贴过代码了,它用来寻找当前节点的父节点。为什么要找父节点,这是因为parent是计算图中可以融合节点的最底层节点。比如A-B-C可以融合,那么B的parent最终会是C,A的parent也会是C。因此通过上面函数的前四行操作之后中间节点的parent都会指向target或target的root。这里和并查集很类似,如果没太理解这个过程可以看一下并查集的合并函数。
完成这些操作之后,RunFuse就返回了一个图graph_,这个图是DAG,并且图中的每个节点的parent表示该节点可以融合到的目标节点。最后存储在std::vector<GraphPartitioner::Group*>这个数据结构之中。
在这之后,还有最后一个操作,即遍历上面的输出图完成真正的融合,生成融合后的Expr。这是通过FuseMutator这个类来完成的,这个类定义了一个std::unordered_map<const Object*, GraphPartitioner::Group*> gmap_;来映射节点对应的可融合目标节点。如FuseMutator类的成员函数Transform所示:
// Run the transform
  Expr Transform(const Expr& body, int fuse_opt_level, size_t max_fuse_depth) {
    // setup the group map.
    auto graph = IndexedForwardGraph::Create(&arena_, body);
    auto groups = GraphPartitioner(&arena_, fuse_opt_level, max_fuse_depth).Partition(graph);
    for (size_t nid = 0; nid < graph.post_dfs_order.size(); ++nid) {
      ICHECK(graph.post_dfs_order[nid]->ref != nullptr);
      gmap_[graph.post_dfs_order[nid]->ref] = groups[nid];
    }
    // The following line can be used for debug.
    // this->DebugDumpGroup(body);
    return this->Mutate(body);
  }
这个函数的具体细节就不继续展开了,读者感兴趣可以自行查看这个类的细节实现,有不理解的也可以找我讨论。我们只需要知道这个类实现了将可以融合的一些列节点转换成Function Expr并进行返回,这样才能让算符融合这个Pass完整就可以了。
0x04. 总结
这篇文章介绍了TVMPass Infra的一些实践例子,然后介绍了支配树和算符融合Pass。TVM学了两个月左右了,目前一直在学习TVM的基础设施,并且Codegen的流程也还没打通,甚至Auto-TVM和Ansor也还没有去学习,学习路程是漫长的。为了不让学习之路变得枯燥,下一节我应该会整点大家看起来比较轻松的话题。
0x05. 参考
- https://www.luogu.com.cn/blog/214gtx/zhi-pei-shu-yang-xie
- https://arxiv.org/abs/1802.04799v1
- https://blog.csdn.net/qq_33287871/article/details/113390487
- https://zhuanlan.zhihu.com/p/337824083
- https://zhuanlan.zhihu.com/p/153098112
欢迎关注GiantPandaCV, 在这里你将看到独家的深度学习分享,坚持原创,每天分享我们学习到的新鲜知识。( • ̀ω•́ )✧
有对文章相关的问题,或者想要加入交流群,欢迎添加BBuf微信:

本文总阅读量次