0x0. 前言
如题所述,本篇文章推荐和讲解一下OneFlow ElementWise模板,FastAtomicAdd,OneFlow UpsampleNearest2d模板的用法以及原理。但OneFlow ElementWise模板的用法和原理在【BBuf的CUDA笔记】一,解析OneFlow Element-Wise 算子实现 已经讲过了,所以这篇文章里不再赘述,主要讲解后面2个。我将上述三个算法的实现都分别抽出来放到了 https://github.com/BBuf/how-to-optim-algorithm-in-cuda 这个工程的 elementwise/FastAtomicAdd/UpsampleNearest2D 三个文件夹中,并且三个算法的实现都分别只用一个.cu文件进行整理,使用nvcc编译可以使用,有需要的同学请自取。
0x1. OneFlow elementwise模板
将 oneflow 的 elementwise 模板抽出来方便大家使用,这个 elementwise 模板实现了高效的性能和带宽利用率,并且用法非常灵活。完整实验代码见 https://github.com/BBuf/how-to-optim-algorithm-in-cuda/blob/master/elementwise/elementwise.cu,原理讲解请看:【BBuf 的CUDA笔记】一,解析OneFlow Element-Wise 算子实现 。这里以逐点乘(z = x * y,其中x,y,z是形状完全一样的Tensor)为例,性能和带宽的测试情况如下 (A100 PCIE 40G):
| 优化手段 | 数据类型 | 耗时(us) | 带宽利用率 |
|---|---|---|---|
| naive elementwise | float | 298.46us | 85.88% |
| oneflow elementwise | float | 284us | 89.42% |
| naive elementwise | half | 237.28us | 52.55% |
| oneflow elementwise | half | 140.74us | 87.31% |
可以看到无论是性能还是带宽,使用 oneflow 的 elementwise 模板相比于原始实现都有较大提升。
涉及到的主要优化技术有向量化数据访问,选取合适的GridSize和BlockSize,循环展开和Grid-Stride Loops等技巧。
模板代码和用法详见: https://github.com/BBuf/how-to-optim-algorithm-in-cuda/blob/master/elementwise/elementwise.cu
0x2. FastAtomicAdd
众所周知,atomicAdd是CUDA中非常昂贵的操作,特别是对于half类型来说 atomicAdd 巨慢无比,慢到如果一个算法需要用到 atomicAdd,那么相比于用 half ,转成 float ,再 atomicAdd,再转回去还要慢很多。但是我们有时候不得不去执行half类型的原子加,这个时候怎么能提升性能呢?
PyTorch给出了一个快速原子加的实现(我这里魔改了一下,去掉了一些不需要的参数,完整测试代码见 https://github.com/BBuf/how-to-optim-algorithm-in-cuda/blob/master/FastAtomicAdd/fast_atomic_add_half.cu ):
// FastAdd is referenced from
// https://github.com/pytorch/pytorch/blob/396c3b1d88d7624938a2bb0b287f2a19f1e89bb4/aten/src/ATen/native/cuda/KernelUtils.cuh#L29
template<typename T, typename std::enable_if<std::is_same<half, T>::value>::type* = nullptr>
__device__ __forceinline__ void FastSpecializedAtomicAdd(T* base, size_t offset,
const size_t length, T value) {
#if ((defined(CUDA_VERSION) && (CUDA_VERSION < 10000)) \
|| (defined(__CUDA_ARCH__) && (__CUDA_ARCH__ < 700)))
atomicAdd(reinterpret_cast<half*>(base) + offset, static_cast<half>(value));
#else
// Accounts for the chance base falls on an odd 16 bit alignment (ie, not 32 bit aligned)
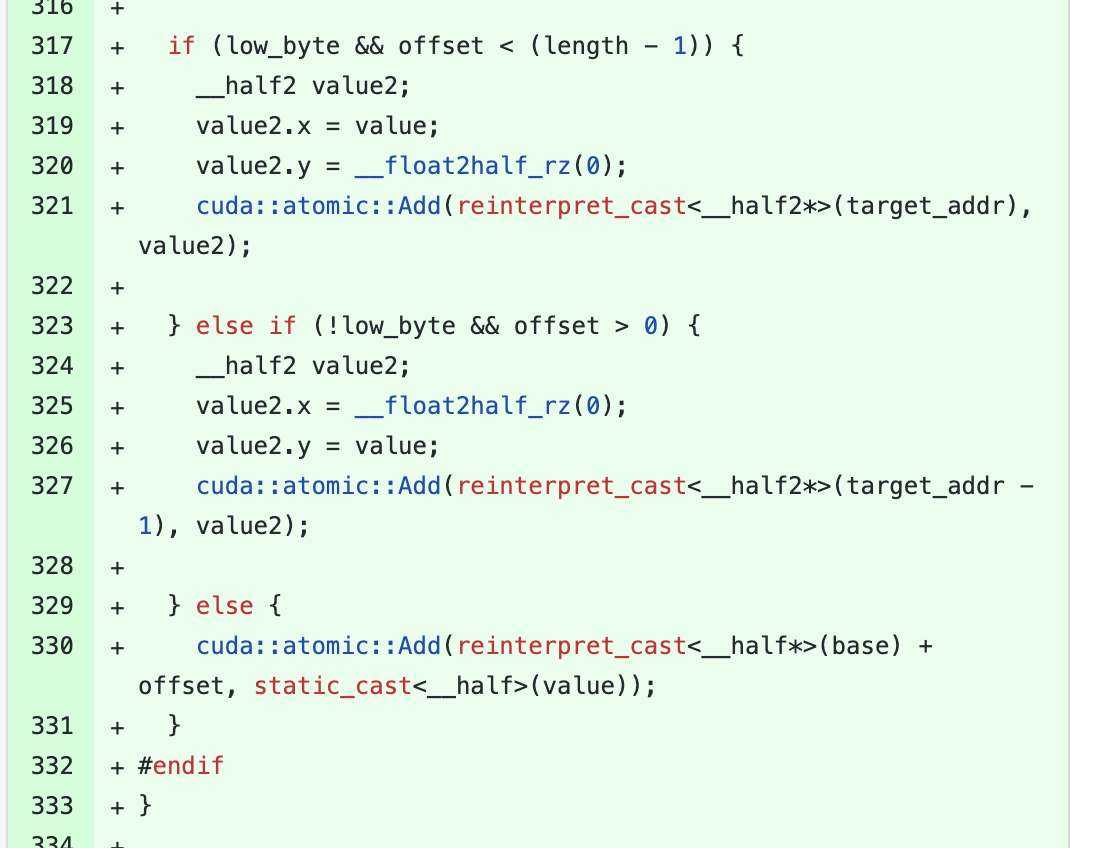
__half* target_addr = reinterpret_cast<__half*>(base + offset);
bool low_byte = (reinterpret_cast<std::uintptr_t>(target_addr) % sizeof(__half2) == 0);
if (low_byte && offset < (length - 1)) {
__half2 value2;
value2.x = value;
value2.y = __float2half_rz(0);
atomicAdd(reinterpret_cast<__half2*>(target_addr), value2);
} else if (!low_byte && offset > 0) {
__half2 value2;
value2.x = __float2half_rz(0);
value2.y = value;
atomicAdd(reinterpret_cast<__half2*>(target_addr - 1), value2);
} else {
atomicAdd(reinterpret_cast<__half*>(base) + offset, static_cast<__half>(value));
}
#endif
}
template<typename T, typename std::enable_if<!std::is_same<half, T>::value>::type* = nullptr>
__device__ __forceinline__ void FastSpecializedAtomicAdd(T* base, size_t offset,
const size_t length, T value) {
atomicAdd(base + offset, value);
}
template<class T>
__device__ __forceinline__ void FastAdd(T* base, size_t offset, const size_t length, T value) {
FastSpecializedAtomicAdd(base, offset, length, value);
}
也就是把half类型的原子加转换成half2类型的原子加,为了验证这个快速原子加相比于half类型的原子加以及pack 2个half 到 half2再执行原子加的性能表现,我实现了三个算法(.cu文件)。它们都是针对half数据类型做向量的内积,都用到了atomicAdd,保证数据的长度以及gridsize和blocksize都是完全一致的。具体如下:
-
https://github.com/BBuf/how-to-optim-algorithm-in-cuda/blob/master/FastAtomicAdd/atomic_add_half.cu 纯half类型的atomicAdd。
-
https://github.com/BBuf/how-to-optim-algorithm-in-cuda/blob/master/FastAtomicAdd/atomic_add_half_pack2.cu half+pack,最终使用的是half2类型的atomicAdd。
-
https://github.com/BBuf/how-to-optim-algorithm-in-cuda/blob/master/FastAtomicAdd/fast_atomic_add_half.cu 快速原子加,虽然没有显示的pack,但本质上也是通过对单个half补0使用上了half2的原子加。
下面展示3个脚本通过ncu profile之后的性能表现:
| 原子加方式 | 性能(us) |
|---|---|
| 纯half类型 | 422.36ms |
| pack half2类型 | 137.02ms |
| fastAtomicAdd | 137.01ms |
可以看到使用pack half的方式和直接使用half的fastAtomicAdd方式得到的性能结果一致,均比原始的half的原子加快3-4倍。
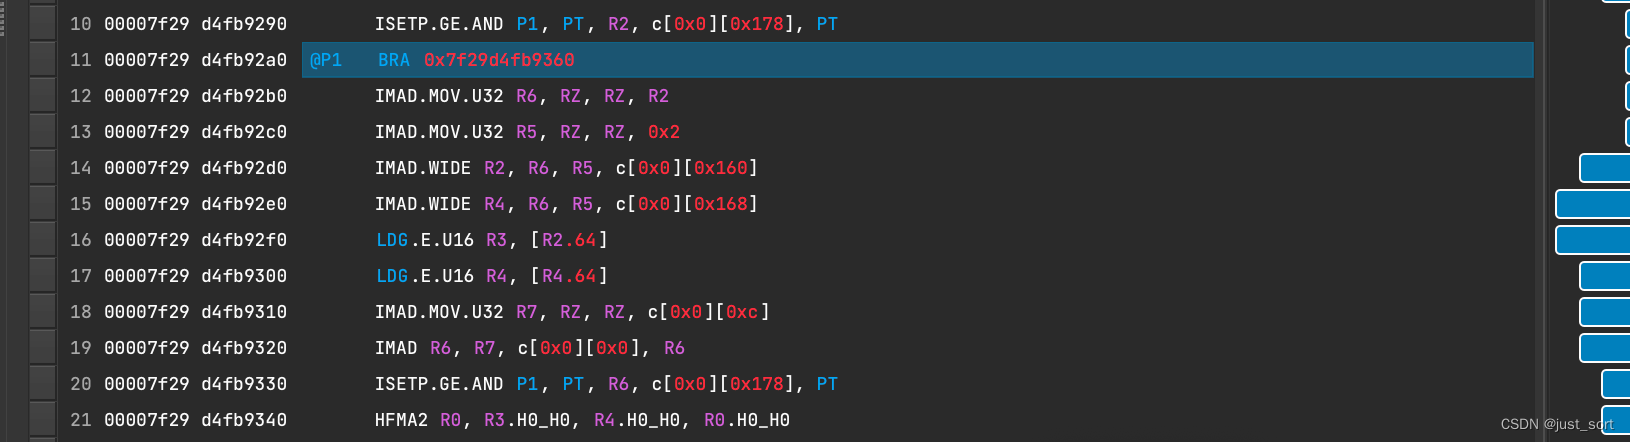
接下来验证一下是否存在warp分支分化问题,对比了一下fastAtomicAdd和pack half2的ncu汇编代码,并未发现不同类型的指令:
fastAtomicAdd 计算部分:
atomicAddhalfpack2计算部分:
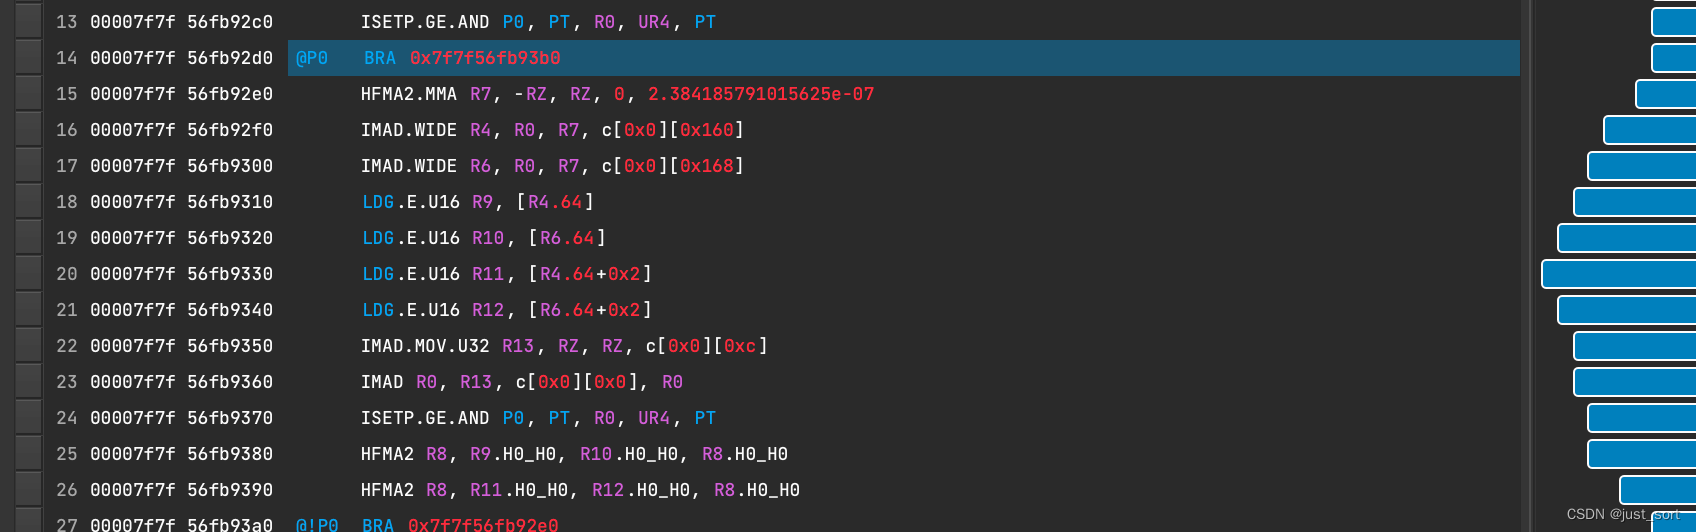
每一种指令的类型都能在两份代码中找到,初步判断不会因为fastAtomicAdd实现中的下述if语句存在线程分化问题。
综上所述,使用FastAtomicAdd可以大幅度提升half数据类型原子加的性能并且不需要手动Pack,使用方法更加简单。
0x3. Oneflow Upsample模板
在Stable Diffusion的反向扩散过程中使用到了UNet,而UNet中存在大量的UpsampleNearest2D上采样。PyTorch对于UpsampleNearest都是通用的实现(https://github.com/pytorch/pytorch/blob/master/aten/src/ATen/native/cuda/UpSampleNearest2d.cu#L112-L163) ,这种实现里面存在大量的取模和坐标映射操作(nn_bw_compute_source_index_fn)以及循环统计贡献等。对于深度学习来说,UpsampleNearest最常用的其实就是2倍上采样,比如Unet和YOLOv5,所以我们完全可以针对这种情况写一个特化的Kernel,很轻量的来完成2倍上采样的计算。下面展示OneFlow中针对2倍上采样的优化(代码见:https://github.com/BBuf/how-to-optim-algorithm-in-cuda/blob/master/UpsampleNearest2D/upsample_nearest_2d.cu#L16-L63)
// CUDA: grid stride looping
#define CUDA_1D_KERNEL_LOOP(i, n)                                                                 \
  for (int32_t i = blockIdx.x * blockDim.x + threadIdx.x, step = blockDim.x * gridDim.x; i < (n); \
       i += step)

// Upsample Nearest2D Kernel is copyed from https://github.com/Oneflow-Inc/oneflow/blob/master/oneflow/user/kernels/upsample_nearest_kernel.cu#L78
template<typename T>
struct alignas(2 * sizeof(T)) Pack2X {
  T x;
  T y;
};

template<typename T>
__global__ void UpsampleNearest2D2XForward(const int32_t in_elem_cnt, const T* in_dptr,
                                           const int32_t in_height, const int32_t in_width,
                                           T* out_dptr) {
  const int32_t in_hw_size = in_width * in_height;
  CUDA_1D_KERNEL_LOOP(index, in_elem_cnt) {
    const T in_value = in_dptr[index];
    const int32_t nc_idx = index / in_hw_size;
    const int32_t hw_off = index - nc_idx * in_hw_size; // 这里是优化掉昂贵的取模运算
    const int32_t h = hw_off / in_width;
    const int32_t w = hw_off - h * in_width;
    Pack2X<T> out_value{in_value, in_value};
    Pack2X<T>* out_pack_dptr = reinterpret_cast<Pack2X<T>*>(out_dptr);
    out_pack_dptr[nc_idx * in_hw_size * 2 + h * 2 * in_width + w] = out_value;
    out_pack_dptr[nc_idx * in_hw_size * 2 + (h * 2 + 1) * in_width + w] = out_value;
  }
}

template<typename T>
__global__ void UpsampleNearest2D2XBackward(const int32_t in_elem_cnt, const T* dy_dptr,
                                            const int32_t dx_height, const int32_t dx_width,
                                            T* dx_dptr) {
  const int32_t dx_hw_size = dx_height * dx_width;
  CUDA_1D_KERNEL_LOOP(index, in_elem_cnt) {
    T dx_value = 0.0;
    const int32_t nc_idx = index / dx_hw_size;
    const int32_t dx_hw_off = index - nc_idx * dx_hw_size;
    const int32_t dx_h = dx_hw_off / dx_width;
    const int32_t dx_w = dx_hw_off - dx_h * dx_width;
    const Pack2X<T>* dy_pack_dptr = reinterpret_cast<const Pack2X<T>*>(dy_dptr);
    const Pack2X<T> dy_pack_value1 =
        dy_pack_dptr[nc_idx * dx_hw_size * 2 + dx_h * 2 * dx_width + dx_w];
    const Pack2X<T> dy_pack_value2 =
        dy_pack_dptr[nc_idx * dx_hw_size * 2 + (dx_h * 2 + 1) * dx_width + dx_w];
    dx_value += dy_pack_value1.x;
    dx_value += dy_pack_value1.y;
    dx_value += dy_pack_value2.x;
    dx_value += dy_pack_value2.y;
    dx_dptr[index] = dx_value;
  }
}
这个地方比较好理解,我们以前向的UpsampleNearest2D2XForward为例,当我们对一个1\times 1\times 2\times 2的矩阵进行2倍上采样时,可以获得1\times 1\times 4\times 4大小的输出Tensor,那么输入和输出的对应关系如下图所示:
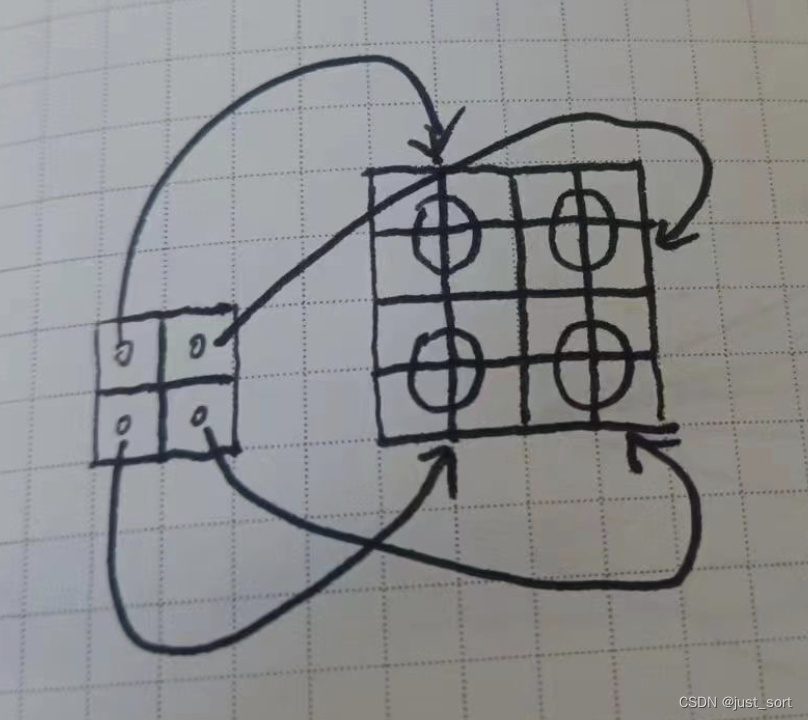
也就是输入的(0, 0)位置对应来输出的(0, 0), (0, 1), (1, 0), (1, 1)的位置。也就是一个输入的元素其实是对应来输出的4个元素,并且这4个元素一定是相邻的2行或2列。所以我们可以使用Pack技术只用2次赋值就完成输出Tensor对应位置元素的填写,进一步提升全局内存访问的带宽。
我这里直接使用 oneflow 的脚本对这两个 kernel 进行进行 profile :
import oneflow as flow

x = flow.randn(16, 32, 80, 80, device="cuda", dtype=flow.float32).requires_grad_()

m = flow.nn.Upsample(scale_factor=2.0, mode="nearest")

y = m(x)
print(y.device)
y.sum().backward()
下面展示了在 A100 上调优前后的带宽占用和计算时间比较:
| 框架 | 数据类型 | Op类型 | 带宽利用率 | 耗时 |
|---|---|---|---|---|
| PyTorch | Float32 | UpsampleNearest2D forward | 28.30% | 111.42us |
| PyTorch | Float32 | UpsampleNearest2D backward | 60.16% | 65.12us |
| OneFlow | Float32 | UpsampleNearest2D forward | 52.18% | 61.44us |
| OneFlow | Float32 | UpsampleNearest2D backward | 77.66% | 50.56us |
| PyTorch | Float16 | UpsampleNearest2D forward | 16.99% | 100.38us |
| PyTorch | Float16 | UpsampleNearest2D backward | 31.56% | 57.38us |
| OneFlow | Float16 | UpsampleNearest2D forward | 43.26% | 35.36us |
| OneFlow | Float16 | UpsampleNearest2D backward | 44.82% | 40.26us |
可以看到基于 oneflow upsample_nearest2d 的前后向的优化 kernel 可以获得更好的带宽利用率和性能。
0x4. 总结
本篇文章推荐和讲解一下OneFlow ElementWise模板,FastAtomicAdd,OneFlow UpsampleNearest2d模板的用法以及原理,并将其整理为最小的可以白嫖的头文件。相关代码请访问 https://github.com/BBuf/how-to-optim-algorithm-in-cuda 这里获得。
本文总阅读量次